One cutting. One glass of water on a windowsill. Weeks later, a brand-new plant, genetically identical to the one you love. Propagation is the closest thing home gardeners have to actual magic, and it costs nothing. Whether you’re looking to multiply a trailing pothos, share a philodendron with a friend, or simply test your plant-growing instincts, learning how to propagate houseplants from cuttings is one of the most rewarding skills you can develop. This guide walks you through every method, water, substrate, and sphagnum moss, with the practical detail that most tutorials skip.
Why Propagate? The Real Upside (and the Honest Limits)
If you love to share your plants with others or want to bulk up your own collection, propagation is the economical way to do it.
A single healthy monstera, pothos, or philodendron can yield dozens of cuttings over a season, that’s potentially hundreds of dollars saved compared to buying plants at retail. But the appeal goes beyond cost. Propagating forces you to actually observe your plants: where the nodes are, how fast stems grow, which branches look healthy. It makes you a better plant parent by default.
The limits are worth naming too.
Bear in mind that you can’t take a cutting from a plant that is patented.
Some newer cultivars fall under plant patents — check the tag before snipping. Beyond legality, not every cutting will take.
Don’t get discouraged if growing from plant cuttings doesn’t work the first couple of times around. It can be a tricky process and takes some trial and error.
Even experienced growers lose cuttings. The goal is to stack the odds in your favor, not to guarantee perfection.
Which Plants and When: Timing Your Cuttings Right
Early spring is the ideal time to propagate by cuttings, although most houseplants can be successfully propagated any time of the year.
That said, timing does matter for some species.
Spring and summer are the best times to take a cutting from a hoya for propagating a new plant since that is their growing season and they’ll spend the season growing much faster than they would if you took a cutting during winter when hoyas have gone to sleep.
As for which houseplants are easiest to start with:
vining houseplants, like pothos, tradescantia, and heartleaf philodendron, are incredibly easy to propagate because of how quickly they grow.
Succulents, like the string of pearls, burro’s tail, and the jade plant, are by far the easiest houseplants to propagate as their shallow root systems allow them to take root easily.
For beginners itching to see results fast, coleus is worth considering, it only takes 2-3 weeks for cuttings to start growing roots, making it one of the fastest and easiest houseplants to propagate.
Whatever the species, the rule for selecting a stem cutting is consistent.
Stem cuttings are often the most reliable method of propagating plants. Take cuttings that are a few inches long with healthy leaves at the top, and then strip away any leaves on the base of the cutting that would interfere with planting. When possible, choose tender rather than woody stems for propagating.
One non-negotiable: always use clean, disinfected scissors or a knife. Dirty tools introduce bacteria to an already vulnerable cut stem, a fast track to rot before roots ever form. A quick wipe with isopropyl alcohol before each cut is all it takes.
For a deeper dive into adapting your care routines by season, including when to take cuttings in winter, check out this guide on winter care for indoor plants.
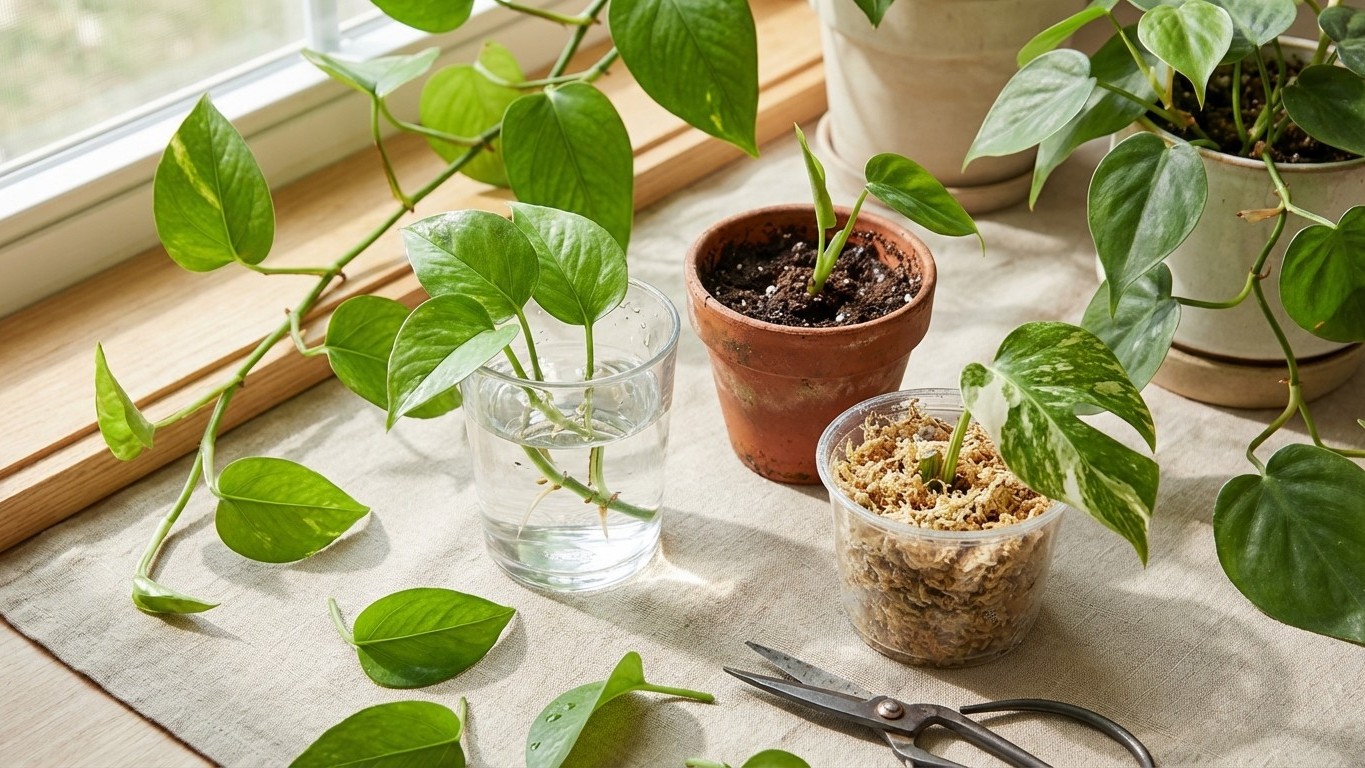
Three Methods for Propagating Houseplants From Cuttings
No single method wins for every plant or every grower. Water propagation is visual and satisfying. Substrate propagation produces stronger roots from the start. Sphagnum moss sits in between, offering the moisture retention of water with a gentler transition to soil. Here’s how each one works in practice.
Water Propagation: The Beginner’s Gateway
One of the most common ways to propagate houseplants is to take a stem cutting and root it in a glass of water. With a little patience, the cutting will develop roots, and you’ll soon be able to repot your brand-new plant.
The visual feedback is addictive, watching fine white roots emerge from a bare stem over a few days is genuinely exciting.
The process is straightforward.
Using sharp shears, cut a 3- to 4-inch piece of stem just below the point where a leaf attaches (the node). Gently remove leaves from the lower part of the stem, because any leaves sitting in water will rot.
Place the cutting in a glass or clear vessel so you can monitor root development.
Put your clipping in a warm place with bright indirect light. Change out the water once a week, and watch your roots begin to grow.
The number-one mistake? Letting water go stagnant.
Make sure to change the water in your vessels every week or so. This will prevent the build-up of bacteria and algae.
A secondary trap is waiting too long before potting.
If your cutting roots in water for too long, it will be less likely to transition well to terrestrial life.
That’s because
water roots are thinner and very fragile. Since they have grown in water, they also aren’t as good at regulating water intake until they transition to soil roots.
Recommended plants for water propagation: philodendron, pothos, and monstera.
These tropical vining species develop visible nodes with aerial root nubs already present, drop the node below the waterline and the rest happens on its own.
Substrate Propagation: Stronger Roots From the Start
Some plants will root in water, but cuttings will develop a better root system when rooted in a soil-less potting mix. Sand or perlite can also be used, especially for cuttings that need good drainage and may rot if kept too wet.
This is the preferred route for succulents, jade plants, and slow-rooting species that would rot in standing water.
Choosing the right substrate matters.
The rooting media needs to have a good balance of water and air holding capacity to support the formation of new roots. Perlite is a great rooting media for cuttings because it holds a good balance of water and air for rooting.
A mix of perlite and peat moss, or perlite and coco coir, is a reliable combination for most tropical houseplants.
The technique: make a hole in the substrate with a pencil or dowel before inserting the cutting.
Make a hole in soil first, then insert the cutting — pushing through the medium can scrape hormone off the stem.
If you’re using rooting hormone powder,
dip only the bottom inch of the cutting and tap off excess before planting. Too much burns stems and drops leaves.
The key to rooting cuttings directly in soil is a balancing act of soil moisture level. You want to find the sweet spot where the soil is adequately moist but not too wet. If the soil is too wet it can rot the cutting before the roots have a chance to develop.
Cover the pot with a clear plastic bag or dome to maintain humidity, and place it in bright, indirect light.
Keep cuttings in bright, indirect light, and high humidity with a bag or dome until roots form. Bottom heat speeds things up. A soil temperature of 70–75°F (21–24°C) works well.
Sphagnum Moss: The Middle Path Between Water and Soil
Sphagnum moss is an extremely popular propagation substrate because it has some fantastic benefits. It is light and fluffy and provides a good balance of moisture and oxygen, helping your cutting to grow roots without rotting.
There’s also a biological bonus:
sphagnum contains antimicrobial properties that may help to discourage rot.
The transition advantage is the real selling point.
Transferring from moss to soil is generally much easier on the plant than transferring from water directly to soil. That’s because roots developed in a sphagnum moss mixture mimic an environment similar to soil.
Setup is simple.
Sphagnum moss can hold up to 20 times its own weight in water, but you don’t want it that soggy, as it will likely rot your cuttings if it’s completely saturated. Squeeze it out so that it is moist but not dripping. At this point, you can choose to mix some damp perlite in with your sphagnum to create extra aeration.
Use a clear container with a lid, the purpose of the lid is to retain humidity, which helps to keep your cuttings happy while they grow roots, and it also prevents the sphagnum from drying out.
For most tropical houseplants, nestle the node into the moss.
For most tropical houseplants, you’ll have cuttings that sprout roots and new growth from the nodes. Often, you’ll see aerial root nubs there, waiting to activate. Gently nestle the node into the moss. There is no need to cover it completely, if it is in contact with the moss and in a humid environment, the roots should start to grow.
One maintenance point many guides miss:
once every day or two, open the lid of your container and allow it to air out for a few minutes. Doing this will allow for air exchange and help to prevent rot or mildew developing.
A sealed container with no airflow is a recipe for fungal problems, not faster roots. For plants that are harder to keep alive year-round, pair your propagation efforts with knowledge about how to care for houseplants in winter (less light) — cuttings need even more careful management in low-light months.
Step-by-Step: Taking and Managing the Perfect Cutting
Regardless of which method you choose, the first steps are identical, and often where beginners go wrong.
Step 1: Select the right stem. Look for actively growing, healthy stems with at least one visible node. Avoid flowering stems for most species —
wait until the plant has finished flowering before taking a cutting.
Avoid stems that look stressed, yellowing, or unusually soft.
Step 2: Make the cut correctly.
Use a clean, sharp knife or scissors to cut the stem just below a node, which is where the leaf attaches to the stem. The cutting should be at least 4–6 inches long, and it should have at least one or two leaves attached.
Remove the leaves from the bottom one-third to one-half of the stem.
Step 3: Condition the cutting. For water propagation, place it directly in a clean vessel. For substrate or moss, optionally dip the cut end in rooting hormone.
It is the constant moisture around a stem node that triggers root development, so whatever medium you use, maintaining consistent moisture around the node is the priority.
Step 4: Provide correct light and temperature.
Place the cutting in a bright, warm location, but out of direct sunlight.
Direct sun will desiccate an unrooted cutting rapidly.
Keep your cuttings between 65°F and 75°F, avoiding excessive heat.
Frequently Asked Questions About Propagating Houseplants
What is the best method to propagate a houseplant? There’s no universal answer, and that’s not a cop-out.
Most houseplants that can be propagated from stem cuttings can be propagated in water, soil, or sphagnum moss.
Fast-growing tropical vines do well in water. Succulents and slow rooters favor substrate. Plants prone to root shock benefit from sphagnum moss as a bridge medium. Match the method to the plant, not the other way around.
Which houseplants are easiest to propagate?
One of the easiest houseplants to propagate is the pothos. These are extremely hardy plants and there is not much you can get wrong when it comes to propagating the plant, especially given that you can propagate it in water alone.
Other reliable beginner plants include heartleaf philodendron, tradescantia, spider plants, and most succulents.
How do you know when a cutting is ready to be potted?
The tip for knowing when to pot a propagated plant is to check the length of your roots. Once they are 1–2 inches long, your cutting is ready to be potted. But don’t rush it — make sure the root system is well-established and strong enough.
For sphagnum moss propagations,
ideally, wait for secondary roots to develop (i.e., the roots are growing roots) before removing the cuttings and potting them up.
Potting Your Rooted Cutting: Getting the Transition Right
A cutting that has rooted is not yet a plant, it’s closer to a very ambitious stem with ambitions. The potting step is where many propagations fail after an otherwise successful rooting.
Pot size matters more than most beginners realize.
The best rule of thumb is to find a pot that is 2–3 inches bigger than the root system. This gives your cutting room to grow, but won’t be so big that you overwhelm your new plant. And check that your pot has a drainage hole for watering.
When transitioning from water to soil, keep the soil consistently moist for the first few weeks.
When transferring a water propagation to soil, make sure to keep the potting medium moist. This will keep it from going into shock after being transferred.
Check in on your plant babies often to make sure they’re not showing signs of transplant shock, yellowing or wilting leaves are the main indicators.
Sphagnum moss propagations have one quirk at this stage.
When transferring the rooted cutting to soil, you will notice that the sphagnum is hard to separate from the roots. Save some time and just leave the remaining sphagnum bits attached to the roots. This will actually provide added moisture and ensure a smooth transition into soil.
Don’t fertilize immediately.
The rooting medium should not contain fertilizer. Begin fertilizing after cuttings are rooted and have been transplanted to a growing medium.
A newly potted cutting is putting all its energy into establishing roots, extra nutrients at this stage can burn the fragile new growth rather than support it. This principle connects directly to broader seasonal care: once established, learn more about adjusting feeding schedules in our guide on indoor plants care varieties houseplants.
Troubleshooting: Why Your Cutting Isn’t Taking
The cutting is wilting, turning brown, or simply doing nothing. Before assuming failure, run through the most common culprits.
Rot at the base. The leading cause of failed soil and moss propagations. Usually caused by too much moisture without enough airflow.
If the moss is too wet and there isn’t enough air flow, the plant cutting will rot. But if the moss is too dry and humidity is too low, the plant won’t root.
In substrate, the fix is to allow the medium to approach dryness slightly between mistings.
No roots appearing after 4+ weeks. Check the temperature first.
Cuttings will root more quickly and reliably in warm rooting mix. Keep your cuttings between 65°F and 75°F, avoiding excessive heat. If your area is too cold, consider a heating mat especially designed for this purpose.
Also verify that the node is actually submerged or in contact with the medium, a cutting floating with its node in open air will never root, regardless of method.
Rooted cutting fails after potting. Almost always transplant shock combined with oversized pot or too-dry soil post-transfer.
Transplant shock refers to the stress that plants experience after they have been moved from one location or growing medium to another. This stress can cause the plant to not root well, therefore stunting its growth. It’s often due to changes in the environment like soil composition, lighting, and watering.
Algae in water propagation vessels. Caused by light hitting the water. Switch to an opaque container, or wrap clear glass in paper.
Using isopropyl alcohol to clean tools and containers before getting started will prevent unwanted bacterial growth.
Advanced Tips From Experienced Propagators
Once you’ve mastered basic cuttings, a few refinements will push your success rate higher.
Rooting hormone, yes or no?
Easy plants like pothos or coleus root fine on their own, but woody shrubs or many perennials often stall or rot without help. The hormone supplies extra auxin, the natural signal that tells stem cells to form roots instead of leaves or shoots. More auxin at the cut end means quicker, stronger root development and higher success rates.
For stubborn or slow species, it’s worth the small investment.
It boosts success rates noticeably but won’t rescue bad technique.
Natural alternatives. Cinnamon powder on the cut end has antimicrobial properties and may act as a mild rooting agent.
Honey is well-known for its natural antimicrobial properties and also promotes cuttings to grow and root more quickly.
These won’t perform like commercial IBA powder on difficult plants, but for easy tropical cuttings they offer a chemical-free option.
Propagation station setups. A dedicated box or tray with a lid, what plant enthusiasts call a propagation station, lets you manage humidity for multiple cuttings simultaneously.
A DIY plastic plant propagation box is a favorite spot for sphagnum moss propagation because it has a lid that holds in moisture, increasing the humidity and allowing the moss to retain water for longer.
Just remember that
opening your box for a few minutes at least every couple of days helps with airflow and prevents rotting, too much humidity is not always a good thing.
Timing your potting precisely.
Track progress by gently tugging cuttings after a few weeks; resistance means roots are forming. Adjust based on plant response.
This gentle tug test is far less disruptive than pulling the cutting out to inspect visually, and it gives you reliable feedback without damaging delicate new roots.
Propagation also pairs naturally with repotting season, dividing root systems during the process is a smart way to multiply plants you’re already handling. For more on managing plants during extended absences, when freshly rooted cuttings are especially vulnerable, see our full guide on how to keep houseplants alive while on vacation.
You started with one plant. Done well, propagation turns that single cutting into a living, rooted record of every houseplant you’ve ever loved, and a generous supply of gifts for anyone lucky enough to come over. The question now is which one you’re going to start with.