The romantic dinner was perfect until disaster struck. A gentle breeze from the open window sent the candle flame dancing, and before I could react, hot wax had cascaded onto my favorite fabric sofa. My first instinct was to grab a cloth and start scrubbing frantically, desperately trying to remove the rapidly hardening mess. What I didn’t realize was that this panicked response was actually making everything worse, pushing the wax deeper into the fibers and potentially damaging the upholstery permanently.
That evening taught me a valuable lesson about patience and proper technique. The method I discovered not only saved my sofa but has since rescued countless other fabric surfaces in my home from similar waxy mishaps. The secret lies in understanding how wax behaves and working with its properties rather than against them.
The Science Behind Wax Removal
Candle wax, whether made from paraffin, soy, or beeswax, has a crucial characteristic that makes removal surprisingly manageable: it becomes solid when cool and liquid when heated. Most people make the Mistake of trying to remove wax while it’s in its stubborn, hardened state, which requires aggressive scrubbing that can damage delicate fabric fibers and spread the waxy residue further into the weave.
The breakthrough technique I learned relies on controlled reheating of the wax to return it to its liquid state, allowing for gentle extraction without the need for harsh scrubbing or chemical solvents. This approach preserves the integrity of the fabric while ensuring complete removal of the waxy substance.
The process begins with patience. If the wax is still warm and pliable, resist the urge to wipe it away immediately. Instead, allow it to cool and harden completely. This might seem counterintuitive, but working with fully hardened wax gives you much better control over the removal process and prevents spreading.
The Gentle Heat Method That Changes Everything
Once the wax has hardened completely, gently scrape away as much of the surface wax as possible using a plastic scraper, old credit card, or even a butter knife with a dull edge. The key word here is gentle – you’re not trying to dig into the fabric, just removing the bulk of the hardened wax that sits on top of the fibers.
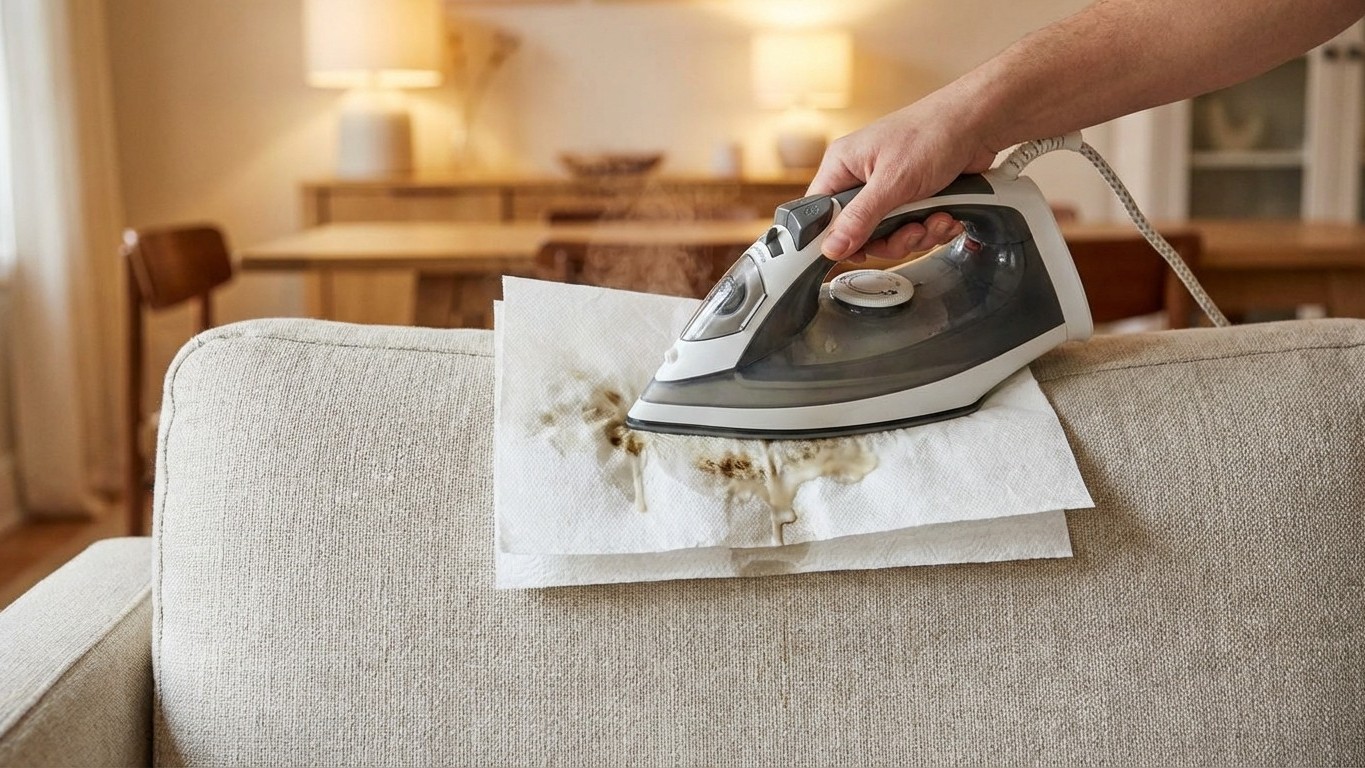
The magic happens with the next step: controlled heat application. Place several layers of clean, white paper towels or brown paper bags over the remaining wax residue. Using an iron set to a medium heat setting with no steam, gently press the iron onto the paper for 10-15 seconds at a time. The heat will melt the embedded wax, which will then be absorbed into the paper towels above.
As you lift the iron and check your progress, you’ll see the wax transferring from the fabric into the paper. Replace the paper towels as they become saturated with wax, and repeat the process until no more wax transfers. This method is remarkably effective because it uses capillary action – the same principle that allows paper towels to absorb spills – to draw the liquefied wax away from the fabric fibers.
The beauty of this technique lies in its gentleness. Unlike scrubbing, which can damage delicate fibers and push wax deeper into the weave, the heat method works with the natural properties of both the wax and the fabric. The controlled temperature melts the wax without overheating the fabric, while the absorbent paper provides a pathway for the wax to escape.
Perfecting the Technique for Different Fabrics
Not all fabrics respond identically to heat, so understanding your upholstery material is crucial for success. Natural fibers like cotton and linen generally handle moderate heat well, making them ideal candidates for this method. However, synthetic fabrics such as polyester or delicate materials like silk require extra caution and lower heat settings.
Before applying heat to the affected area, always test the iron temperature on an inconspicuous section of the fabric. Start with the lowest heat setting and gradually increase if needed. Some fabrics may require multiple sessions with lower heat rather than one intense application.
For particularly stubborn wax residues, especially colored candle wax that may leave a stain, a follow-up treatment can help. After removing the bulk of the wax with the heat method, dab the area with a small amount of rubbing alcohol on a clean cloth to address any remaining color residue. Always work from the outside of the stain toward the center to prevent spreading.
Prevention and Long-Term Fabric Care
While knowing how to remove candle wax is invaluable, prevention remains the best strategy for maintaining beautiful upholstery. Strategic candle placement, using proper holders, and being mindful of air currents can prevent most waxy accidents from occurring in the first place.
This gentle removal technique has applications beyond candle wax. The same principle works effectively for removing other waxy substances like crayon marks, chewing gum, or even some types of adhesive residues. The key is always the same: patience, controlled heat, and absorbent materials to draw the substance away from the fabric.
The next time you face a candle wax emergency, remember that your first response sets the stage for success or failure. Put down that scrub brush, take a deep breath, and let the wax cool completely. Then, armed with an iron and some paper towels, you can restore your fabric to its original condition without the stress, damage, or expense of professional cleaning. This simple technique has saved countless sofas, curtains, and other fabric surfaces, proving that sometimes the gentlest approach is also the most effective.