Most struggling houseplants share one thing: they’re sitting in the wrong soil, inside the wrong pot, with no idea how to shed excess water. Learning how to choose pot size for houseplants is crucial for addressing these issues. Correct those three variables and you’ll fix almost every chronic problem, yellowing leaves, stunted growth, recurring root rot, without buying a single new plant. This guide covers everything from soil chemistry to fertilizer timing, so you can make informed decisions rather than educated guesses.
Why the Right Substrate Makes or Breaks Your Indoor Plants
What soil Actually does for your houseplant’s root system
Good soil doesn’t just absorb water — it holds onto that moisture over time and releases it to healthy plant roots as they need it, while simultaneously not drowning roots and causing rot or a myriad of other issues.
That balancing act sounds simple. In practice, most store shelves are full of generic mixes that do one job decently and the other poorly. Understanding what your soil actually needs to do is the first step toward fixing that, and learning how to improve drainage for potted plants is essential for maintaining this critical balance.
Aeration is very important for healthy plant roots; therefore, a balance must be struck between soil hydration and aeration.
When water saturates every pore in the root zone, oxygen gets pushed out.
In healthy soil, there are lots of little air pockets around the soil particles. When these are saturated with water, the plant’s root tissues start to die off from the tips. The plant is starved of oxygen and carbon dioxide can’t move away.
That’s root rot in plain language, not a disease you catch, but a slow suffocation you cause.
There’s also the question of nutrients.
Houseplants are not heavy feeders and do not require a lot of fertilizer for maintenance. However, they are grown in artificial potting mixes that have almost no nutrients.
Fresh potting mix often contains some starter nutrients, but those deplete within a few months. After that, the substrate is essentially inert scaffolding, which is why following an indoor plant fertilizer schedule and periodic repotting matter so much. Speaking of repotting, knowing the signs a houseplant needs repotting helps you refresh that growing medium before nutrients are completely exhausted. For more detailed guidance on when to repot indoor plants, timing is crucial for plant health. If you need step-by-step guidance, our comprehensive tutorial on how to repot a houseplant walks you through the entire process. For a broader view of what different indoor plants care varieties houseplants need in terms of growing conditions, our complete guide covers species-by-species requirements.
Standard potting mix, specialized blends, and what to avoid
Potting soil isn’t one size fits all, meaning you can’t just grab dirt from outside or garden soil and use it for your indoor plant. Outdoor soil is typically very dense and made of water-retaining materials that can cause problems for houseplants due to excess water retention, which may lead to root rot and other health issues.
Garden soil compacts in a pot and cuts off airflow to the roots. That’s why
using garden soil in indoor containers could lead to disease and pest problems. Instead, choose a good-quality soilless potting mix created specifically for potted plants.
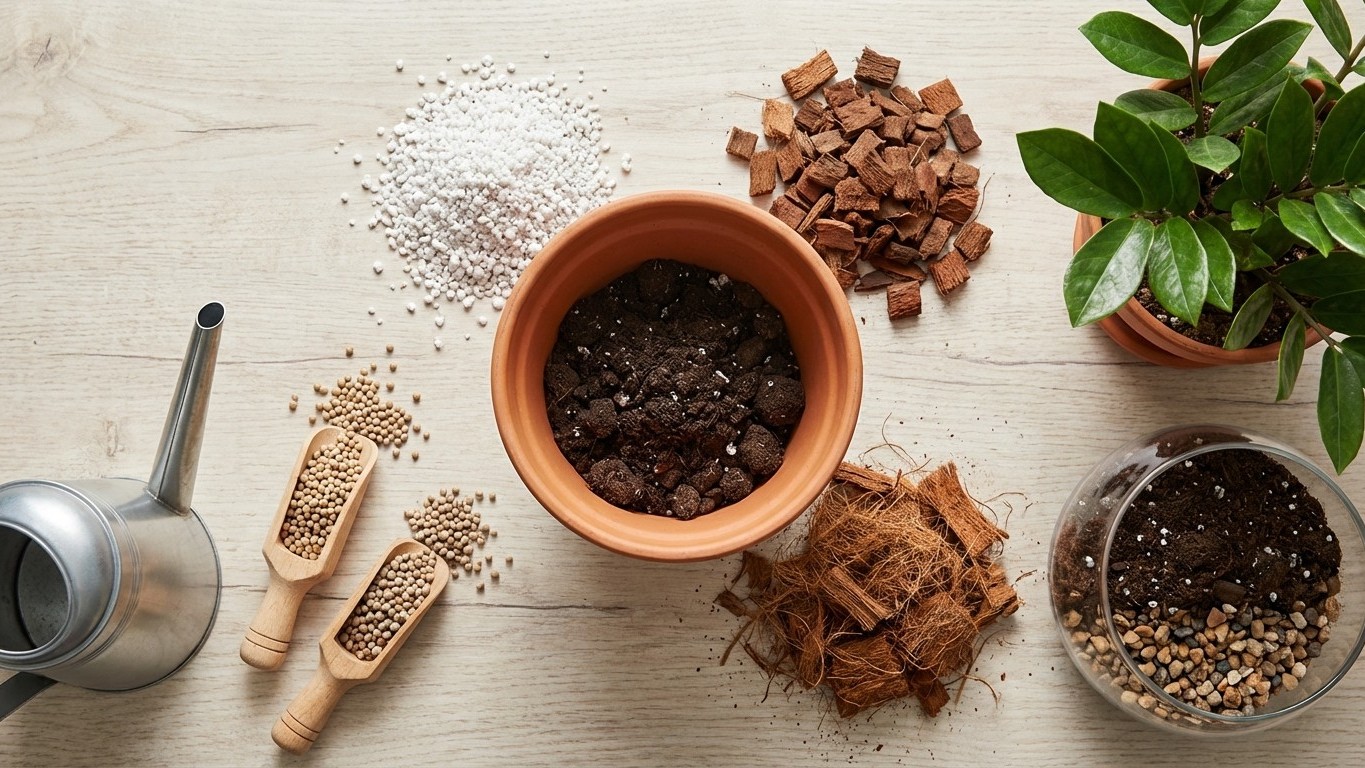
Soil for indoor plants is made from peat moss or coco coir, worm castings, and perlite or vermiculite — these ingredients provide organic matter essential for healthy houseplants.
That basic formula works well as a starting point, but every plant type has a slightly different preference. A one-size-fits-all bag from the hardware store gets you halfway there. The real gains come from understanding what’s in it and what to add.
Choosing the Best Soil Mix for Each Type of Indoor Plant
Tailoring your mix: succulents, tropicals, aroids, and flowering plants
Think of soil the way a chef thinks about a recipe base: the ratios change everything.
A basic houseplant mix, 50% peat moss or coco coir, 25% perlite, 25% compost, is a great starting point for most plants.
From there, you adjust based on what your plant is asking for.
Aroids, the monstera, philodendron, pothos crowd, want rich, slightly moisture-retentive soil.
Monsteras and philodendrons often like richer soil: 40% peat/coco coir, 20% perlite, 30% compost, 10% worm castings.
Succulents and cacti are the opposite extreme.
Drainage is key for succulents and cacti: 30% peat/coco coir, 40% perlite or pumice, 30% coarse sand (not fine beach sand) is a reliable formula.
The key Ingredient difference between drought-tolerant and moisture-loving plants comes down to two minerals: perlite and vermiculite.
While perlite can suck up four times its weight in water, vermiculite sponges up to sixteen times its weight in water.
So
perlite is a popular addition to potting mix for plants that require excellent drainage and not too much moisture, such as cacti and succulents, since soil with perlite dries out more quickly.
Meanwhile,
vermiculite is often added to the soil of moisture-loving potted plants such as ferns, primroses, and calla lilies, which can lose their lives if allowed to dry out.
Ingredients, additives, and what to skip
The anatomy of a quality potting mix has a few consistent players.
Commonly listed ingredients include peat moss, worm castings, perlite, and vermiculite. Other ingredients might be added such as fertilizer and natural soil amendment materials.
Worm castings deserve a mention here:
adding compost gives your plants a slow-release food source and introduces good bacteria that help keep them healthy.
Horticultural grit or coarse sand is another option.
Unlike vermiculite and perlite, gravel and grit hold no water at all, although it will still keep your potting mix open and free-draining.
A word of caution on sand:
only washed or horticultural-grade sand of medium to coarse grade should be used in potting mixes.
Fine beach sand clogs pores, the exact opposite of what you want.
One additive worth avoiding entirely: cheap filler materials that aren’t designed for horticultural use.
Some cheaper mixes have fillers like sand that make them heavy and cloggy.
Spend slightly more on quality ingredients and you’ll repot less frequently, fertilize more efficiently, and troubleshoot far fewer root problems.
Eco-responsible options: peat-free, homemade, and biological substrates
Peat moss has dominated potting mixes for decades, but it comes from bogs that take thousands of years to form. The shift away from it is accelerating.
Coco coir was treated as a waste product for decades until its use as an excellent substrate was realized. It has fantastic water retention properties and a texture that encourages healthy root development. In recent years, there has been a shift toward greater adoption of coconut coir-based mixes since it is generally considered a more environmentally sustainable option.
Making your own mix is another route.
A standard recipe for a homemade soilless mix consists of half sphagnum peat moss (or its coco coir equivalent) and half perlite or vermiculite.
The upside is precise control.
Mixing your own soil allows you to tweak every little detail, from soil aeration to nutrient balances, providing a level of control unmatched by bagged soil.
The catch: always wear a dust mask, since
perlite and vermiculite generate a lot of dust, so you’ll want to wear a respirator while mixing.
Pot Material, Size, and Drainage: The Decisions That Shape Root Health
Terracotta, plastic, ceramic, and glass, what actually matters
Pot selection feels like an aesthetic choice. It’s actually a watering strategy.
Clay pots provide a healthy environment for most plants. The porosity of clay allows air and moisture to penetrate the sides of the pot. This moisture and air is utilized by the fine roots located at the edge of the soil ball.
That’s a meaningful advantage if you water generously or tend to overdo it.
Clay pots act like a wick to remove excess moisture from the potting soil, which can be both an advantage and a disadvantage depending on your watering habits. Gardeners with a heavy hand at watering tend to over-water; their plants will probably benefit from clay.
Plastic pots flip the equation.
When it comes to keeping soil moisture levels just right, plastic pots can be very advantageous. They have a useful non-porous surface that helps to reduce water evaporation.
The practical result:
tropical plants, ferns, and palms would be great plants to grow in plastic pots.
Glazed ceramic behaves similarly, like plastic, glazed ceramic pots hold moisture longer and may be a good choice for underwaterers. Due to the glaze, they do not allow for airflow to the roots the same way terracotta does.
One temperature point often overlooked:
the thicker walls of terracotta containers help regulate soil temperature. Roots are more insulated and less exposed to extreme ranges of hot and cold temperatures.
In an air-conditioned apartment where temperatures swing between seasons, that insulation matters more than most people realize.
Sizing your pot correctly, the “one size up” rule
Bigger is not better. A pot that’s too large holds more soil than the roots can reach, and that excess damp substrate stays wet indefinitely, creating the perfect environment for fungal issues.
If the goal is to let the plant grow larger, prepare to repot it into a slightly larger container.
The Brooklyn Botanic Garden is even more specific:
for a root-bound or stunted plant, the replacement pot should be a step up from its current pot, but not overly large, for instance, if the plant is currently in a 3-inch pot, you’d want no larger than a 5-inch pot.
Drainage holes, saucers, and cache-pots
No drainage hole means no margin for error.
For indoor pots, having no drainage at the bottom can make things easier, but it makes watering with the right amount of water extremely important — because if you add too much water, the roots won’t dry out fast enough and could rot, eventually killing the plant.
If you fall in love with a decorative pot that has no hole, double-potting is your best friend:
place your plant in a smaller, properly designed pot with drainage holes inside the decorative one. This allows you to remove it for watering and ensures excess water drains away from the plant’s roots.
Saucers are useful but can become a liability. Always empty standing water after watering — roots sitting in a pool for hours is exactly what you’re trying to prevent.
Add a tray large enough to catch any water that drains for indoor plants, but pour out any water accumulating after it’s finished draining to stop the soil from sitting in water.
Drainage: The Science Behind Healthy Roots
Poor drainage is the single most common reason houseplants die slowly.
Our plant friends are sensitive to excess moisture. Sitting in a pool of water can cause problems such as root rot and other types of fungus.
The fix is built into the substrate itself, not at the bottom of the pot, and that distinction matters.
There’s a persistent myth that placing gravel or pebbles at the bottom of a pot improves drainage. It doesn’t.
It’s a common myth that we should put gravel or other coarse-textured material in the bottom of a container to improve drainage. It seems intuitive that it should work, but our intuition is wrong.
Here’s the physics:
when you put a layer of gravel at the bottom of the pot, the saturated layer simply moves up. The layer of gravel actually reduces the usable depth and brings the saturated soil layer closer to the plant’s roots.
Real drainage improvement happens by amending the mix itself.
You can boost a potted plant’s airflow and water drainage by adding different materials and aggregates to the potting soil. Materials like perlite, coarse sand, clay aggregates, vermiculite, and compost can all improve the structure of your plants’ soil.
For pots without holes, activated charcoal is a practical secondary tool:
on top of small rocks, a thin layer of horticultural charcoal allows water to drain through and into the rocks, helps absorb extra water, provides nutrients for the roots, and contains natural microbials that can help avoid bacterial and fungal issues.
For a full technical deep-dive into drainage layering techniques, our dedicated guide on how to improve drainage for potted plants covers everything from clay balls to substrate ratios with precision.
Repotting Your Houseplants: Method, Timing, and Common Mistakes
Recognizing the signs and choosing the right moment
Houseplants have a more challenging time than their outdoor relatives. While plants in the wild can stretch their roots far and wide to find nutrients, our indoor friends are limited to the small amount of soil in their pots. And no matter how much you fertilize, that soil won’t last forever.
The clearest signal:
the first sign you’ll see is roots growing out of drainage holes. From this, it’s obvious the pot is too small for the plant.
Other signs are less dramatic but just as telling —
roots poking out of the top or bottom of containers and moisture getting absorbed from the soil too quickly after watering
both indicate a root-bound plant.
Root rot occurs when a plant has been overwatered or left sitting in water. You may notice sagging leaves, leaves falling off, black rot at the soil level, or even fungus gnats.
Timing matters too.
The best time to repot a plant is in the spring when it naturally and actively begins its seasonal growth. The roots will grow into the new potting mix, and the plant will produce new foliage.
Some fast-growing species such as philodendron or pothos may outgrow their home and need repotting every year or so.
Our article on when to repot indoor plants breaks down specific seasonal windows and dormancy considerations by plant type.
Step-by-step method and errors to avoid
About two days before repotting, water your plant thoroughly to prepare for the move.
This hydrates the roots and makes extraction easier without damaging delicate root tips. Prepare your new container:
if the container was used previously, it needs to be cleaned, wash it thoroughly and sanitize it with a solution of one part bleach to nine parts water.
New unglazed clay pots require a specific step:
a new porous container such as unglazed clay will require soaking in water overnight. This prevents the container from soaking up the moisture from the potting mix when the plant is first repotted.
Once your pot is ready,
place a small square of screen over the hole at the bottom of the pot, this allows excess water to drain through the hole but prevents the potting mix from doing so. Next, remove the plant and gently tease the roots so that they are no longer densely matted or circling the root ball.
The most common repotting Mistake: choosing a pot that’s far too large. The second most common: damaging the roots through rough handling.
The perfect soil should be light and fluffy, with a generous helping of compost and sterilized organic matter. Inexpensive potting soil is not always a bargain because it may be too heavy and hold too much moisture.
After planting,
fill the pot with soil until the crown of the plant is at the same level as it was growing previously. Gently pack the soil around the roots and water to eliminate air pockets.
For a fully illustrated walkthrough with every common mistake mapped out, our guide on how to repot a houseplant goes step by step through the entire process.
Fertilizer and Nutrition: Feeding Your Houseplants Without Burning Them
Types of fertilizer and what each does
Although the name is a bit misleading, fertilizer isn’t actually “plant food.” Rather, plants make their own food using sunlight in a process called photosynthesis. Fertilizer is more like a multi-vitamin for your plants with essential nutrients. In a natural environment, these essential nutrients get replenished in the soil from decomposition of organic material and weathering of rocks over time.
The most common houseplant fertilizers come in liquid or slow-release granular form.
For convenience, most prefer to use one of the many kinds of fertilizer products designed specifically for houseplants. These come in several different analyses, with the most common types having a 1:1:1 ratio of nitrogen to phosphate to potassium.
Specialty plants like orchids, succulents, and carnivorous plants are the exception:
some plants require specialty fertilizer with a specific balance of nutrients. Examples include cacti, succulents, carnivorous plants, and epiphytic plants such as orchids.
When to fertilize and how to avoid root burn
Plants grow the most during spring and continue their growth into the summer, starting to slow down in the fall for their more dormant winter rest. Keep this in mind when adding fertilizer to your care regimen: starting strong in the spring and summer, slowly winding down into the fall, and leaving them alone for the winter.
Less is genuinely more.
Dilute your fertilizer more than the label recommends. You can always add more fertilizer but you cannot take any back once used. Adding too much fertilizer can cause damage called “fertilizer burn” that can lead to death of your plants if it goes untreated.
After repotting, hold off entirely:
adding extra fertilizer immediately after repotting can overwhelm the plant with too many nutrients, which might cause fertilizer burn or over-fertilization, potentially damaging the roots and hindering growth. Waiting 4–6 weeks before adding fertilizer gives the plant time to settle into its new environment.
For a complete fertilizing schedule broken down by season and plant category, including specific dosage guidance, see our full resource on the indoor plant fertilizer schedule.
FAQ: Quick Answers on Substrate, Pots, and Fertilizer
What is the best soil mix for indoor plants?
The ideal potting soil should have perlite, coir fiber, vermiculite, and compost. Vermiculite and coir fiber help your soil retain moisture, while perlite helps keep the soil light and aids drainage. Compost provides nutrients and organic materials to the potting mix.
Can I use outdoor garden soil for my potted indoor plants? No.
Sterilized loam soil is worth the cost to avoid disease, insect, and weed problems that may exist in unsterilized soil. Soil taken directly from the garden may be contaminated with these pests, causing possible future problems such as dead, deformed, or stunted seedlings.
How do I improve drainage in pots for houseplants? Mix drainage-boosting amendments directly into your substrate — perlite, coarse sand, or clay aggregates. Avoid adding a layer of gravel at the base, as
this practice has been shown to be more problematic because of the collection of stagnant water and pushes the saturated water table layer up, increasing the risk of root rot.
How often should indoor plants be repotted?
Most gardeners recommend repotting about once a year, typically in the spring and summer months.
That said, slow-growing plants like succulents or snake plants can go two to three years without needing a new home. Watch for root signals more than calendar dates.
What kind of fertilizer do indoor plants need?
There are many different fertilizers available, formulated for all sorts of different plants. While you can certainly use an all-purpose fertilizer formulated for houseplants, sometimes it’s good to use a formula tailored to a specific kind of plant. Different fertilizer blends are available for tropical plants, orchids, citrus, succulents and cacti, and more.
Going Deeper: Related Guides in This Series
The topics covered here connect directly to the other practical guides in this plant care collection. If you’re building a green interior from scratch or troubleshooting a specific problem, these resources extend what you’ve read above:
- Complete species profiles and fundamental care routines: indoor plants care varieties houseplants
- Detailed repotting walkthrough with visual guidance: how to repot a houseplant
- Seasonal timing and dormancy considerations: when to repot indoor plants
- Technical drainage science and substrate layering: how to improve drainage for potted plants
- Full fertilizing calendar with seasonal dosage charts: indoor plant fertilizer schedule
Soil, pot, drainage, repotting, fertilizer, these five variables form a closed system. Improve one without the others and you’ll see partial results. Get all five right and your houseplants stop being a source of frustration and start doing what they’re actually supposed to do: grow. The next time a plant looks stressed, resist the instinct to water more or move it to a brighter spot. Ask instead: is it in the right substrate? Is the pot the right material and size? When did you last refresh the soil? The answers are almost always there, just beneath the surface.