A pot that looked “fine” last year can quietly become a bottleneck. Roots circle, soil compacts, water runs straight down the sides, and your plant starts acting… off. One yellow leaf. Then two. The instinct is to change the watering schedule. Often, the fix is simpler: learn how to repot a houseplant properly, Without breaking roots or drowning fresh soil.
Repotting is not just “moving a plant into a bigger pot.” It’s a reset of the root zone: structure, oxygen, drainage, and nutrients. Done well, it’s like giving your plant new lungs. Done poorly, it’s stress, rot, and weeks of sulking on the windowsill.
This guide walks you through each step, the Mistakes that Actually kill houseplants, and the small pro habits that make the difference. You’ll also find pointers to the rest of the cluster, especially the pages on timing, substrate, and drainage.
Why and when to repot an indoor plant
Benefits of repotting for plant health
Fresh potting mix changes the physics of your watering. Old mix tends to shrink, compact, and lose its airy structure, so roots get less oxygen and beneficial microbes struggle. Repotting restores porosity, helping water soak evenly instead of channeling through cracks.
Space matters too, but not in the “go huge” way. When roots have just enough new room, they branch outward and build a dense, efficient network. That network supports sturdier growth above the soil line: thicker stems, larger leaves, better resistance when your heating dries the air in February.
There’s also the hidden nutrient angle. Even if you fertilize, depleted soil can become inconsistent: some pockets hold salts, others go inert. Repotting evens the playing field.
How to recognize the right moment (see the signs page)
Some signals are obvious: roots coming out of drainage holes, the plant popping up as a single “plug,” or the pot drying out far faster than it used to. Others are more subtle: stunted growth despite good light, soil that repels water at first contact, or a plant that topples because the root mass can’t anchor it.
Timing is not just about the calendar. It’s about growth. Spring and early summer are often easiest because many houseplants are actively growing, so they rebuild roots faster. The Royal Horticultural Society advises avoiding autumn and winter repotting for many plants because growth slows and fresh compost can stay too wet for too long. If you must repot in winter, you do it with extra restraint: minimal root disturbance, careful watering, stable indoor temperatures.
If you want a deeper decision framework, use the sister page when to repot indoor plants for seasonality, signs, and pacing: when to repot indoor plants.
Supplies you need to repot a houseplant
Choosing the right pot: size and material
Most indoor plants do best when you “size up” modestly. A common guideline is moving to a pot about 1 to 2 inches wider in diameter than the current pot for small to medium houseplants. Oversizing sounds generous, but it often creates a swamp: too much wet soil, not enough roots to drink it, and a higher risk of rot.
Material changes how quickly soil dries. Unglazed terracotta breathes and can be forgiving if you tend to overwater. Glazed ceramic and plastic hold moisture longer, helpful for thirsty plants, risky for plants that prefer to dry between waterings. Your lifestyle matters here. If you travel, a more moisture-retentive pot can be practical. If you water “for comfort,” pick something that dries a bit faster.
Drainage is non-negotiable for most houseplants. If the pot has no drainage hole, you’re choosing a higher-skill route and you’ll need a strategy, like using a nursery pot inside a decorative cachepot, then emptying runoff consistently.
Selecting the right substrate and prep (link to the parent page)
Potting “soil” for indoor plants is usually a soilless mix designed to hold moisture while staying airy. The right mix depends on your plant category: tropical foliage, aroids, orchids, cacti, succulents, and so on. If you want a structured overview of ingredients, amendments, and fertilizer context, use the parent page: best soil for indoor plants.
One prep detail saves a lot of mess: slightly moisten your fresh mix before potting. Not soggy. Just evenly damp so it packs around roots without turning into sludge.
Other useful tools (gloves, watering can, and more)
- Gloves, especially for plants with irritating sap or spines.
- A tarp, tray, or old towel. Repotting is not polite to carpets.
- A small trowel or scoop for soil.
- Clean scissors or pruners for trimming dead roots.
- A chopstick or blunt skewer for teasing mix into gaps without crushing roots.
- A watering can with a narrow spout for controlled watering.
- Optional: a stake and soft ties for tall plants that wobble after repotting.
Step-by-step: how to repot a houseplant
1) Prep the plant and the new pot
Start with a plant that’s hydrated, but not freshly drenched. Many gardeners water lightly a few hours to a day before repotting so the root ball slides out more easily and roots are less brittle. If the soil is bone-dry, it can crumble and tear fine roots. If it’s soaked, everything turns heavy and oxygen-poor.
Check the new pot: confirm the drainage hole is open, and make sure you have a saucer or a plan for runoff. If you’re reusing a pot, wash it first. Old residue can carry pests or disease and can also clog drainage.
Skip the “rocks in the bottom” habit unless you have a specific reason and know the tradeoffs. Better drainage comes from a well-structured mix and a functional drainage hole, not a false bottom.
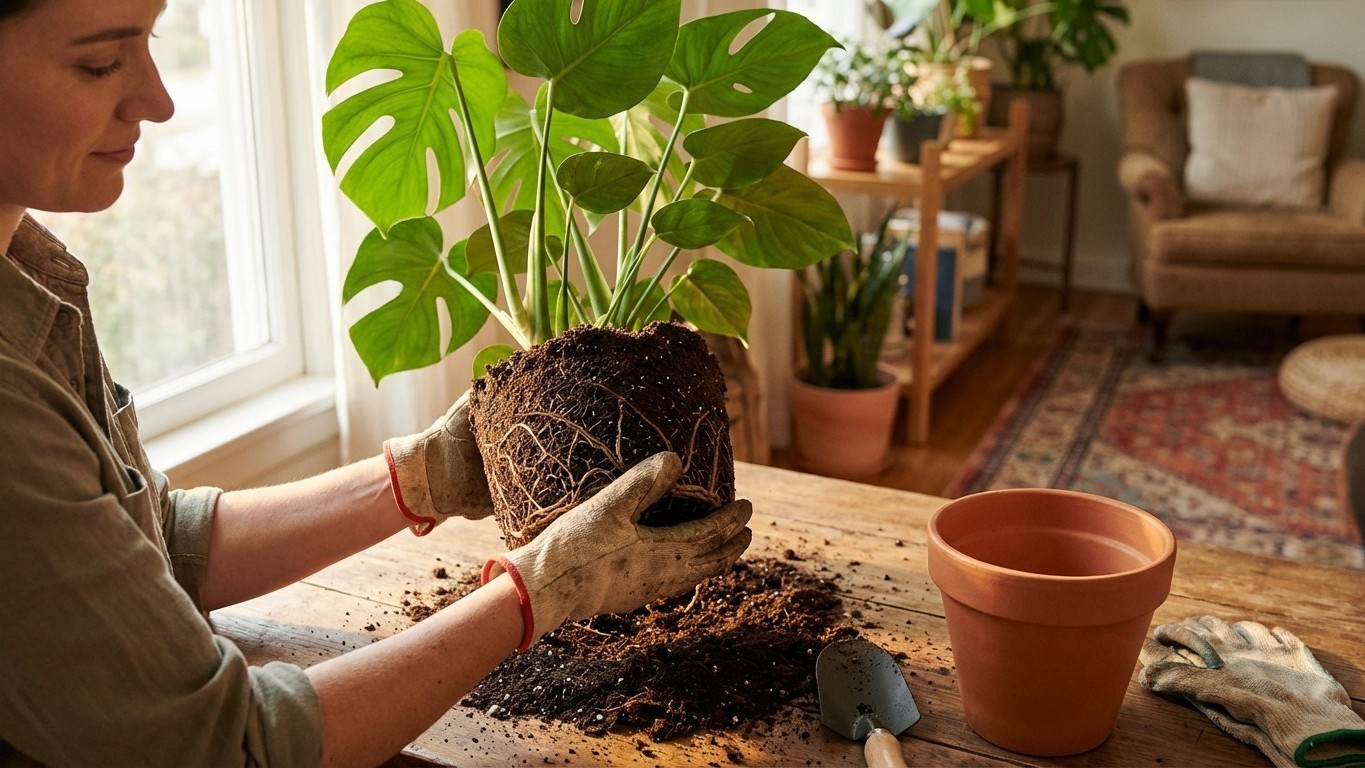
2) Remove the plant gently (depotting)
Turn the pot on its side, support the base of the plant near the soil line, and tap the pot edges. If it won’t budge, run a blunt knife around the inside edge for plastic pots, or squeeze the pot walls to loosen the root ball.
If roots are fused to drainage holes, don’t yank. Push them back through from the outside or cut the plastic pot if it’s cheap. Your plant is not a cork. Treat it like a living system.
3) Loosen the roots and assess what you see
Look for the pattern: are roots circling tightly, forming a dense coil? That’s a classic rootbound situation. In that case, gently tease the outer layer with your fingers. Your goal is to encourage new roots to grow outward into fresh mix, not to shred the entire root ball.
Healthy roots are typically firm and light-colored. Dark, mushy, or foul-smelling roots suggest rot. Dry, hollow roots suggest past underwatering or salt stress. This inspection is where repotting becomes plant care, not just home decor maintenance.
4) Prune only when needed and remove some old mix
Trim truly dead or rotting roots with clean scissors. Make clean cuts. Ragged tearing heals poorly.
Removing all old soil is usually unnecessary for routine repotting and can increase stress. A practical approach: loosen and remove the outer layer and the bottom “mat” if it’s very compacted, then keep the core intact. Less disturbance, faster recovery.
Want to keep the plant in the same pot size? Root pruning can work for certain houseplants, but it’s a technique, not a shortcut. Some sources advise trimming the outer inch or two of the root mass for plants you’re returning to the same container, followed by fresh mix. It’s not for every species, and it demands careful aftercare.
5) Position the plant at the correct height and backfill
Add a base layer of fresh mix, then set the plant so the top of the root ball sits at roughly the same height it was before. Planting deeper can invite stem rot; planting too high exposes roots and dries the crown.
Fill around the sides with fresh mix, nudging it into gaps with a chopstick. Firm lightly. Think “stable,” not “compressed.” You want contact between roots and mix, but you also want air pockets.
Leave a small rim at the top, roughly an inch, so watering doesn’t overflow instantly. That rim is your future sanity.
6) Water, then choose a recovery spot
Most houseplants benefit from a thorough watering right after repotting to settle the mix around the roots. Let excess water drain fully, then empty the saucer. This first watering is about contact, not saturation for days.
Next, give the plant a calm environment. Bright indirect light is often ideal for recovery, even if the plant normally tolerates stronger sun. Avoid cold drafts and heater blasts. Repotting stress can show up as drooping or leaf drop for days to a couple of weeks, especially if roots were disturbed.
If your plant needs a new location for better light, do it gradually. Sudden change can stack stress on stress.
Common repotting mistakes (and how to avoid them)
Overwatering or underwatering after repotting
The irony: freshly repotted plants can be both more sensitive to drought and more vulnerable to rot. Disturbed roots absorb water less efficiently at first, so the plant wilts easily, and many people respond by watering again. That’s how soggy soil starts.
Use a simple rule: after the initial settling-in watering, return to your normal rhythm, but verify with your finger. Check the top inch or two of mix. If it’s still moist, wait. If it’s dry and the pot feels light, water. Consistency beats guesswork.
Humidity can help recovery for tropical plants because it reduces water loss through leaves while roots rebuild. Grouping plants or using a humidifier tends to be more effective than misting, which is short-lived and can encourage leaf issues in some homes.
Picking the wrong pot or substrate
A pot that’s too large is one of the most common failure points. It turns watering into a gamble because the soil volume stays wet far longer than the root system can handle.
Substrate mistakes are quieter but just as real. A dense mix in a low-light room can stay wet for days. A very airy mix in strong light can dry too fast for your schedule. Your home is part of the substrate equation.
If you want a reliable baseline, build your plan from the dedicated guide on potting mixes: best soil for indoor plants.
Forgetting drainage or damaging the roots
Drainage failures don’t always look dramatic at first. The plant might look “fine” for two weeks, then yellowing starts from the bottom and the soil smells stale. That’s a root-zone oxygen problem.
Good drainage is a system: a hole, a structure that doesn’t compact instantly, and watering habits that allow air back into the pot. For a full breakdown, lean on the drainage page in the cluster: how to improve drainage for potted plants.
Root damage is often mechanical. Pulling, ripping, shaking all the soil off, or leaving roots exposed to air for too long. Work efficiently. Prep first. Then move.
Advanced tips for a smoother repotting
Help the plant bounce back: fertilizer, humidity, placement
Fertilizer timing is where many well-meaning people sabotage recovery. Fresh potting mix often contains nutrients already, and stressed roots don’t need extra salts. Waiting a few weeks before feeding is a common recommendation, especially for slow growers.
Placement is the stealth lever. Give the plant stable temperatures and avoid direct midday sun immediately after repotting. Leaves can burn more easily when roots are rebuilding.
For humidity-loving plants, aim for steady humidity rather than occasional misting. A humidifier or grouping plants can reduce stress, especially in heated winter apartments in the U.S. climate zone context of February.
Repotting delicate plants, cacti, and large floor plants
Delicate plants, like some ferns or calatheas, dislike rough root handling. In practice, that means a “minimal disturbance” repot: loosen only the outer edge, keep the core intact, and prioritize an evenly moist, airy mix.
Cacti and succulents ask for almost the opposite: fast-draining mix, careful handling, and a conservative watering approach after repotting. If roots were damaged, letting cuts dry briefly before watering can reduce rot risk. Also, heavy watering plus low winter light is a common disaster combo for succulents.
Large plants bring physics. Sometimes you can’t realistically size up without doubling the weight of the pot. Top-dressing becomes your friend: remove a few inches of old mix from the top and Replace with fresh mix, improving nutrients and structure without the logistics of a full repot.
Aftercare: what to do in the following weeks
Week one is mostly about stability. Don’t rotate the plant daily, don’t move it between rooms, and don’t keep “checking” by poking the roots. Let it settle.
Weeks two to four are when you watch for patterns: new growth, steady leaf posture, normal drying time between waterings. If the soil stays wet for a long time, reduce watering volume and check your light level. Many indoor rot problems are really light problems wearing a watering costume.
Notice white crusts on the pot or soil surface? That can point to mineral buildup from hard water or fertilizer salts. It’s not always an emergency, but it’s a signal worth addressing, especially after you’ve just refreshed the root zone.
One extra move that pairs well with repotting: propagation. If your plant has multiple stems or you’re already handling vines, repotting is a natural moment to take cuttings or divide, as long as the plant is healthy enough to tolerate it. The key is not stacking stress on a plant that’s already struggling.
FAQ: quick answers about repotting houseplants
How do I know if my houseplant needs repotting?
Look for root cues (roots through drainage holes, circling roots, the root ball Holding the pot shape) and soil cues (water running down the sides, soil drying unusually fast, compacted mix). Plant cues matter too: stalled growth in good light, frequent wilting, or instability in the pot.
Can I repot a plant in any season?
You can repot year-round indoors, but the risk profile changes. Spring and early summer are often easier because many plants grow actively and recover faster. Autumn and winter repotting can succeed, especially if the plant is in trouble, but you’ll need to be more careful with watering because growth slows and wet mix can linger longer.
Should I water immediately after repotting?
For most houseplants, yes: water thoroughly once to settle the mix and eliminate large air gaps, then let excess drain and empty the saucer. After that, don’t “keep it wet.” Follow your normal pattern based on how fast the new mix dries, using touch and pot weight as your guide.
Related resources inside the cluster
If you’re building a consistent routine, these companion pages help you make better decisions than any one-size-fits-all checklist:
- For timing, frequency, and signals: when to repot indoor plants
- For choosing and mixing substrates, plus fertilizer context: best soil for indoor plants
- For pot drainage strategy (holes, layers, mix, watering method): how to improve drainage for potted plants
- For a broader overview of plant categories and care baselines: indoor plants care varieties houseplants
Repotting changes the underground world your plant lives in, and your home habits decide whether that world becomes airy and productive or wet and stagnant. Next time you pick a pot because it matches your shelf, will you also pick the drainage and soil structure that match your schedule?