You’ve just noticed something is off with your favorite fiddle leaf fig. The leaves look dusted with tiny pale dots, a faint silvery sheen is spreading across the surface, and, if you look closely, there’s a ghost-like webbing hugging the leaf undersides. Congratulations: you have spider mites. The good news? houseplant problems like this one are entirely fixable when you know what you’re dealing with. The less-good news: you need to act now.
Eggs hatch in as little as 2 to 4 days, and nymphs develop just as fast — meaning you could leave for a week’s vacation and come back home to a full-blown infestation.
That math is brutal. But it also explains exactly why a clear, step-by-step strategy beats any panicked, once-over spray job. This guide walks you through identification, treatment (natural first, chemical when necessary), and the long-term monitoring routine that actually prevents recurrence.
Recognizing Spider Mites: Signs and the Damage They Leave Behind
What Does a Spider Mite Infestation Look Like?
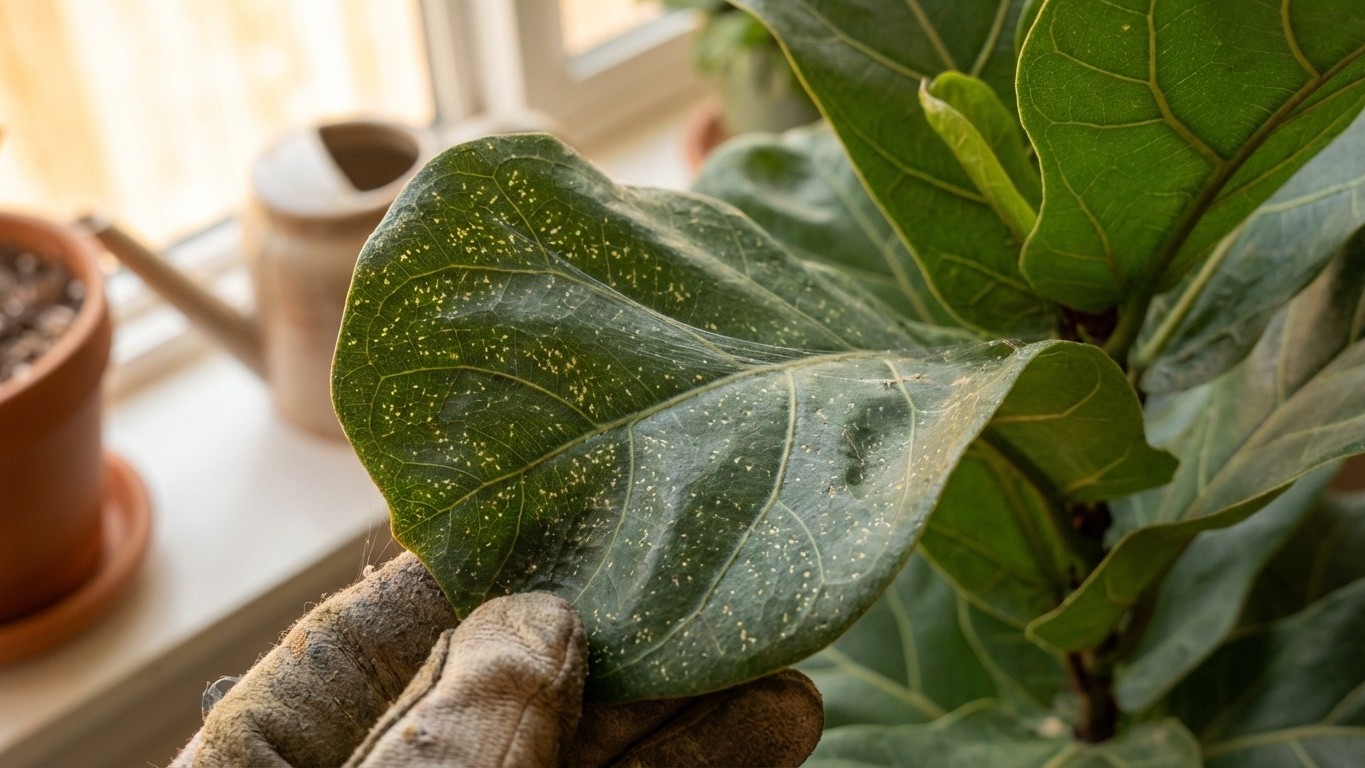
Mites are tiny and difficult to detect. You’ll usually notice plant damage, stippled or yellowing leaves, before you ever spot the mites themselves.
That’s the core frustration with this pest: the visible warning comes after the damage has already begun.
Leaves develop tiny white or yellow spots where mites have been feeding. This feeding removes chlorophyll, the substance that gives leaves their green pigment. Heavy feeding can result in leaves that lose almost all of their green pigment, though more commonly the pigment is removed in small dots at the feeding area, called stippling.
The webbing produced by spider mites is often one of the most noticeable signs of an infestation. It serves as protection for the mites and their eggs and can sometimes make the plant look dusty or dirty.
In severe cases,
the webbing may appear on top of leaf surfaces as well as around the junction between the leaf and stem.
Leaves may start to turn yellow or bronze, eventually drying out and falling off. The overall vigor of the plant declines, leading to stunted growth and a dull appearance.
If your plant’s leaves are also curling, that can signal a compounding issue, explore the full picture of indoor plant leaves curling causes to rule out other stressors.
How to Confirm the Diagnosis (and Distinguish Spider Mites from Other Pests)
The white paper test is your best friend here.
Place a white sheet of paper under the plant leaves and tap the leaf sharply. The spider mites will tumble off the leaf and onto the paper.
Tiny moving dots? That’s your answer.
The adult has eight legs with an oval-shaped body approximately 1/50 of an inch long. The body is commonly greenish or almost translucent, although it may be brown to orange-red. Two dark spots on the body are easily viewed using a 10X to 15X magnifying lens.
Unlike fungus gnats (which hover around the soil) or mealybugs (which leave cottony white deposits), spider mites leave a very specific combination of stippling plus webbing.
Injured tissues turn silvery, may yellow, and then bronze before drying out or falling off. Nutrient deficiency like chlorosis or yellowing might be confused for mite stippling damage — look for other symptoms and signs of mites to help differentiate.
If why are my houseplant leaves turning yellow is your main concern, always check the undersides of the leaves before assuming it’s a nutrition or watering issue.
Why Your Indoor Plant Got Hit: Conditions That Invite Spider Mites
The Conditions They Love
Spider mites are a common pest of houseplants. They prefer warm, dry environments with low humidity levels.
Spider mites thrive in hot, dry weather. Ideal conditions are temperatures in the 80s°F and above, and low humidity (less than 50%). Populations can build up any time humidity is lower than 90%. When these conditions persist, and especially when nights are also warm, a new generation of spider mites develops every 5 to 7 days.
In winter, your central heating is essentially creating a perfect spider mite resort inside your living room.
Plants are more susceptible to a pest infestation if they are already stressed
, so a plant that’s been underwatered or placed in poor-quality light becomes a much easier target.
Spider mites are so ubiquitous indoors and out, you may find yourself with an infestation by simply bringing a new plant home, by cutting flowers and bringing them inside, or even just potentially leaving your windows open if you have landscaping right outside.
They’re so small, they can even hitch a ride into your home on you or your pets.
One myth worth busting:
spider mites are not breeding in your soil. Don’t worry about treating your soil.
The Houseplants Most at Risk
Houseplants most affected by spider mites include a variety of species, especially those with broad, thin leaves rather than small, fleshy ones. Spider mites seem to struggle to pierce through the thicker, waxier epidermises of plants like succulents and cacti.
Spider mites are notorious for infesting Alocasia, Calathea, Crotons, English Ivy, Palms, and Ficus trees like the Fiddle Leaf Fig.
Common indoor plant targets include palms, calathea, and English ivy. “Palms are spider mite magnets,”
according to horticulturist Justin Hancock of Costa Farms. If you grow any of these species, build regular inspections into your watering routine from day one, prevention is infinitely easier than cure. For a broader overview of care by species, see this guide to indoor plants care varieties houseplants.
Treatments: Natural Remedies First, Chemicals When Necessary
Natural Solutions That Actually Work
Water is your first weapon.
Washing plant foliage using a soft cloth or a forceful spray of lukewarm water can help reduce the spider mite population if done repeatedly.
The key word is “repeatedly” — a single rinse dislodges mites but does not destroy eggs.
Mix one tablespoon of castile or liquid dish soap with one quart of lukewarm water. Either spray the plant using a spray bottle or dip a clean cloth into the soap and water solution and wipe down the leaves, don’t forget the underside. Repeat the treatment every few days for two weeks to be sure you’re killing mature mites and their eggs.
Neem oil is the most effective long-term natural miticide.
Neem oil has a residual effect to keep pests from coming back quickly. Derived from the neem seed, neem oil kills pests, eggs, and larvae on contact.
Neem oil can make your plant sensitive to sunlight, so it’s best to avoid direct sunlight for a few days after treating your plant.
Apply it every 3 to 5 days initially, then step down to weekly once the infestation is under control.
Plant-extract acaricides based on garlic, clove oil, mint oils, rosemary oil, and cinnamon oil are also available and effective.
For large collections, biological control is worth considering.
Two of the more common beneficial insects are Chrysopa carnea (green lacewing larvae) and Phytoseiulus persimilis (predatory mites), both spider mite predators that can be ordered online.
Phytoseiulus persimilis are formidable opponents because they can eat spider mites and reproduce faster than spider mites.
Chemical Treatments: When and How to Use Them
Other control options include treating plants with an insecticide containing permethrin or pyrethrin. Insecticidal soap and horticultural oil are also
effective chemical options for severe infestations. That said, chemical miticides come with a real caveat:
spider mites have demonstrated a knack for becoming resistant to certain chemical pesticides over time.
Spider mites frequently become a problem after applying broad-spectrum insecticides, commonly because the insecticide kills off the mites’ natural enemies but also because certain insecticides stimulate mite reproduction.
If using a pesticide, always read the label carefully before buying and again before using the product. This is especially important as the availability and recommended use of specific pesticides may change from year to year. The label is the final authority on how you may legally use any pesticide.
Treat in a well-ventilated area, keep children and pets away during and after application, and follow the waiting period specified on the label before allowing contact with the plant again.
Precautions During Treatment
Don’t use soaps or oils on water-stressed plants or when temperatures exceed 90°F. These materials may injure some plants, so check labels and/or test them on a portion of the foliage several days before applying a full treatment.
Some soaps can damage the plant, so it’s best to test on a few leaves before spraying the entire plant.
Neem oil acts as a natural pesticide and is not toxic to pets, humans, or other animals, a meaningful advantage over synthetic miticides, especially in homes with curious cats or dogs.
Step-by-Step Action Plan: From Diagnosis to Recovery
Step 1 : Isolation and Emergency First Response
The first thing to do is quarantine the affected plant so you can prevent pests from spreading to your other indoor plants. Try keeping it in a different room, but if that is not possible, make sure it is at least several feet away from other plants until the spider mites are eradicated.
Then immediately inspect every neighboring plant, because
spider mites crawl from plant to plant, so one infested plant can spread them throughout your home.
While you’re at it,
clean and disinfect the area the plant was in before you moved it, as well as your hands afterwards.
Step 2 : Physical Removal and Leaf Cleaning
Trim heavily-infested leaves with a pair of plant snips and discard them. Already-damaged leaves won’t bounce back from spider mite damage, and removing heavily-infested areas can eliminate a large majority of pests on the plant.
Then shower the plant.
Spraying down your plant, either in a tub, sink, or outdoors, will help to remove the spider mites and the residue they leave behind. This will also help to remove their blanket-like webbing. Thoroughly spray down the tops and bottoms of all the leaves as well as the stems of the plant.
Don’t skip this mechanical step before applying any product.
Leftover webbing can actually repel pest control products that are applied later, resulting in a prompt re-infestation of your plant.
Step 3 : Apply Your Chosen Treatment
If an insecticide is needed, use an insecticidal oil or insecticidal soap (or a combination of the two). Completely cover the undersides of leaves. Be sure mites are present before treating.
Apply neem oil every 3 to 5 days to kill pest eggs indoors and interrupt the reproductive cycle. Make sure to spray all plant parts, including the undersides of leaves.
Rotate between insecticidal soap and neem oil to prevent the population from developing resistance.
Step 4 : Monitoring and Managing Recurrence
You will most likely need to use the treatment process several times to fully break the spider mites’ life cycle. Retreating once every 5 to 7 days for at least two weeks is recommended.
After your initial application, reapply three more times with each application three days apart. After this, re-treat once every two weeks for 2 to 3 more treatments. This will help ensure all spider mites, regardless of where they are in their lifecycle, are eliminated.
If there are no new spider mites found after several weeks of inspecting the plant, you can add it back to your collection.
Keep in mind that recovery takes time.
Those pesky mites were there for a long time before your plant got to a point where you could see the damage. It’s going to take time for the plant to heal and bounce back. Be diligent in checking the plant for signs of new or continued infestation, and be patient while it heals.
Preventing Spider Mites from Coming Back
Controlling Humidity and the Environment
Spider mites prefer a dry environment, so the best way to keep them off your plants is to create a more humid environment. As most houseplants are tropical, they’ll appreciate this and thrive.
Since spider mites like it dry, keeping the air humid around your plants is a great way to deter them from settling. Use a humidifier for the room, periodically spray a fine mist on your plants, or leave a container of water to evaporate nearby.
Drop the temperature in the room and increase the humidity around your plants to slow down reproduction.
Building a Regular Inspection Routine
One of the best ways to protect your plants is to check them regularly. A 10x hand lens will make this much easier. Every 3 to 5 days, check your plants and see if there are any leaves with white or yellow spots on them.
Many experienced plant owners do this at watering time — it takes thirty seconds per plant and can save weeks of treatment later.
Keep newly acquired houseplants in an isolated area, away from other houseplants for a few weeks. Use this time to monitor the plants for any pest problems before placing them with the rest of your healthy plants.
Keeping Plants Strong and Resistant
The best way to avoid heavy spider mite damage to your houseplants is to check your houseplants on a regular basis for any signs of problems and start treating the plant as soon as you discover any pests. Plants are more susceptible to a pest infestation if they are already stressed, so it’s important to provide proper care to your plants to keep them happy and healthy.
Adequate irrigation is important, because water-stressed plants are most likely to be damaged.
Dust accumulation on leaves is another underestimated risk:
dust on leaves encourages mites.
A monthly wipe-down with a damp cloth is one of the simplest prevention habits you can adopt.
FAQ: Frequently Asked Questions About Spider Mites on Indoor Plants
How do you know if your indoor plant has spider mites?
The most classic and definitive sign is fine, silky webbing — look for delicate web-like strands especially where the leaf meets the stem and on the undersides of leaves. The primary damage is stippling: thousands of tiny silvery-white or yellow dots covering the leaf surface where mites have sucked out the chlorophyll.
When in doubt, use the white paper test: tap a suspect leaf over white paper and look for moving specks.
What is the first thing to do when you notice spider mites?
At the first sign of spider mites, isolate your plant before the little blighters spread to your entire plant family.
Then rinse the entire plant, leaves, stems, and all the hidden undersides, with lukewarm water. Only after that physical removal should you apply a treatment product.
Can I get rid of spider mites naturally without chemicals?
Yes, in most cases.
Though dealing with recurring infestations can be extremely frustrating, it’s not difficult to eliminate spider mites from your indoor plants. The keys are to treat them immediately, be persistent in your fight, and strive to maintain healthy houseplants.
Insecticidal soap, neem oil, and regular water rinses are sufficient for the vast majority of infestations when applied consistently over two to four weeks.
How long does it take to eliminate spider mites from indoor plants?
Realistically, expect a minimum of two to four weeks of active treatment for a moderate infestation.
“Once and done doesn’t work,” according to horticulturist Justin Hancock, because spider mites reproduce so quickly. One treatment of horticultural oil will not solve the infestation. Weekly follow-ups are necessary, and are recommended for at least three or four weeks.
Severe infestations caught late may require six to eight weeks. If the infestation has already overtaken most of the plant,
the best control option may be to discard the plant. Before removing it, place a plastic bag over the plant to help prevent any spider mites from migrating to other houseplants.
The longer question, one that goes beyond pest control, is why your plants kept getting hit in the first place. Spider mites are opportunists. They target stressed, dry, crowded plants in overheated rooms. Address those root conditions and your infestation becomes a one-time story rather than a seasonal battle. What does your plant’s environment look like right now?