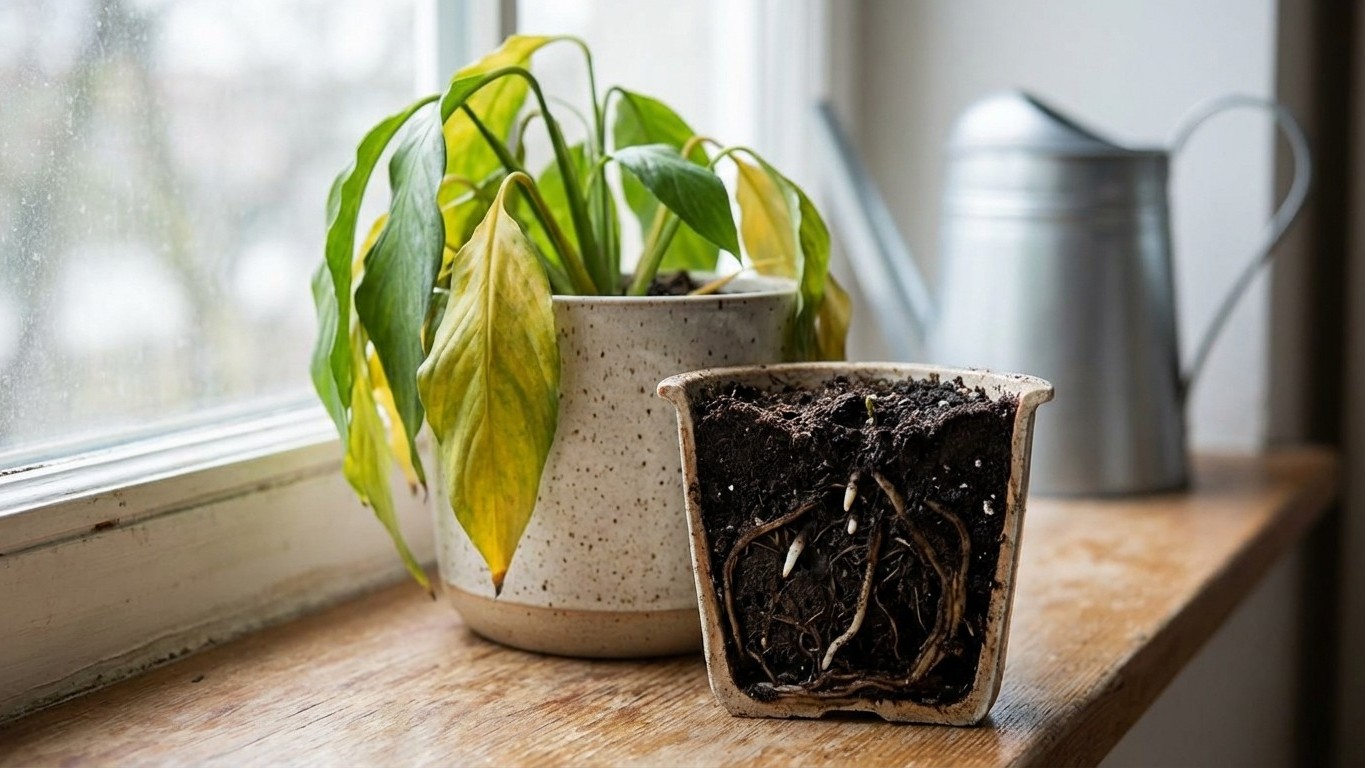
Your plant wilts even though the soil is soaking wet. You water it again, thinking it’s thirsty. The situation gets worse. Sound familiar? This is the cruel paradox of root rot in houseplants: the damage happens underground, invisible, while the symptoms above look deceptively like dehydration. By the time most plant owners figure it out, the roots have been quietly decomposing for weeks.
Root rot is a fungal disease that occurs when the roots of the plant become waterlogged and begin to decay — typically caused by overwatering or poor drainage, which creates an environment conducive to fungal growth.
The tricky part?
The symptoms of root rot look very similar to the symptoms of underwatering. This is because rotten roots are unable to absorb water for the rest of the plant, so while the roots are wet, the leaves may be dying of thirst.
Getting a plant back from root rot is possible. But it requires fast, methodical action, and a much clearer understanding of what’s actually happening in that pot.
What Root Rot Actually Is (and What’s Really Causing It)
The Biology Behind the Problem
While it’s easy to say root rot is caused by “too much water,” it’s actually a combination of two things: opportunistic fungi and oxygen deprivation. In a healthy environment, soil is porous, filled with tiny air pockets that allow roots to breathe. When soil becomes waterlogged, these air pockets collapse. Without oxygen, the root cells begin to die and decay, and this decaying organic matter acts as a beacon for fungal pathogens like Fusarium, Pythium, Phytophthora, and Rhizoctonia.
Potted houseplants are more prone to root rot than their planted counterparts, since it’s harder to control moisture and water can become contained.
A garden plant growing in open ground has an exit route for excess water. A plant in a sealed ceramic pot on your windowsill does not. That’s why root rot is disproportionately a houseplant problem, root rot is particularly prevalent among houseplants and indoor plants rather than garden plants, since indoor plants are more susceptible to overwatering.
One more underrated cause worth mentioning:
excess moisture can provide the right conditions for a fungal infection that attacks the roots. The fungus may have made its way into the soil through contact with contaminated gardening equipment like shears and pots, or may have been present in the soil when you bought it.
Buying cheap, unsterilized potting mix is essentially gambling with your plant’s life underground.
How to Identify Root Rot in Houseplants
Visible Symptoms: What the Plant Is Telling You
Although root rot primarily affects a plant’s underground root structure, signs of root rot can become apparent both above and below ground.
Above the soil line, the picture is one of slow, puzzling decline.
Symptoms include stunted growth and wilted and discolored leaves that may start falling off. Stems and foliage can also become soft and mushy.
Leaves may turn yellow or brown, starting at the tips and progressing toward the center of the leaf — often accompanied by leaf drop.
And here’s the tell-tale sign that separates root rot from drought stress:
the plant may appear wilted even though the soil is moist, because the roots are unable to take up water due to damage or decay.
If you’ve just watered but your plant still droops, check below the surface before adding more water.
Plants with root rot will often also have a strong, unpleasant smell coming from the soil.
Think of it as fermented, eggy, deeply organic. Not the pleasant earthy smell of fresh potting mix, something fouler. That odor alone should prompt immediate investigation.
The Root Check: Your Definitive Diagnosis
The only way to confirm root rot is to examine the roots. Gently remove the plant from its container and brush away enough soil to see the root ball.
What you’re looking for is straightforward once you know the contrast.
Healthy roots should be firm and white. In plants with root rot, roots may appear dark, mushy, and may even have a foul odor.
Look out for warning signs of rot like dark brown root color, soft texture or spongy roots, or even fuzzy moldy material coating the roots. These are all signs of damaged roots. Normal healthy plants without rot should have firm roots with light coloring, usually either beige, green, or tan.
The UC IPM program at the University of California confirms:
root rots are frequently characterized by wilting or discoloration of above-ground plant parts. Off-color, brownish to blackish, or dark yellowish, roots, especially at the root tips, often indicate that root rot is present. Healthy roots should be white, entirely so or at least under their outer covering.
For more guidance on diagnosing what’s affecting your plant, see our full guide to houseplant problems, which covers a range of diseases, pests, and cultural issues beyond root rot.
How to Save a Plant with Root Rot: Step by Step
The Repotting Rescue Method
Your plant doesn’t inevitably have to die from rotting roots. It’s possible to revive that houseplant — but acting quickly at the first signs of distress is imperative.
Speed matters more than perfection here. Every day the roots remain in wet, infected soil, the fungus spreads further.
Here’s the method, step by careful step:
- Remove the plant from its pot and shake off as much old soil as possible, gently, to avoid tearing healthy roots.
- Trim away any mushy, brown, or rotting roots using sterile scissors or pruners. Rinse the remaining roots gently with warm water to remove as much of the soil as possible.
- Prune away damaged roots and leaves at roughly the same rate. For example, if you removed a quarter of the plant’s damaged roots, prune away about a quarter of the plant’s leaves, targeting damaged or older leaves toward the bottom.
- Dispose of the soil where the root rot occurred, then wash the pot thoroughly with a bleach solution. It’s very important to sterilize the environment before repotting, otherwise the root rot will just take hold again.
- Allow the plant’s root system to dry out for 24 hours before planting.
- Repot the plant using new pasteurized potting soil.
One important note on pot size:
when repotting, plant in a container that is only an inch or two larger than the root ball. Planting in a container that is too large will just increase the odds of root rot developing again.
A smaller, well-draining vessel is your best ally right now.
A smaller terracotta pot is ideal, as it absorbs excess moisture, minimizing conditions for root rot.
Natural Treatments and Fungicides: When They Help
Once the rotted material is removed, you have an optional but worthwhile extra step.
Disinfect the roots with hydrogen peroxide. This is optional, but it can help kill off fungal spores and bacteria that may still be remaining on your plant’s root ball. Mix 1 part 3% hydrogen peroxide with 2 parts water and spray the roots thoroughly.
On the question of commercial fungicides, the University of Wisconsin-Madison Plant Pathology team is direct:
they do not recommend use of chemical fungicides for control of root rots on houseplants because of the limited availability of products for use by home gardeners, and because those products that are available tend to be expensive.
The hydrogen peroxide approach is more practical and accessible.
Be careful with chemical treatments and fungicides, unless you’re absolutely sure of your plant’s root rot diagnosis and the type of fungus attacking its roots, avoid harsh chemicals, as they might not be the right tools for the job.
After Treatment: How to Tell If It’s Working
After rescue, water sparingly and let the plant dry out significantly before watering again — a moisture meter can help gauge levels. For plants that have suffered from root rot, it’s crucial to avoid overwatering to prevent restarting the root rot cycle.
New leaf growth appearing within three to six weeks is a positive sign. The plant is recovering.
When should you give up?
If the entire root system is mushy, that plant is unlikely to come back. But if there are some healthy roots left, you’re still in with a chance.
And if the situation is truly terminal,
consider taking a few cuttings from the growth tips to propagate. That way, even if the plant doesn’t survive, you can keep it going through its cuttings, a perfect clone of the original.
Also remember:
while the plant is regrowing roots, do not fertilize it, as this may stress it.
Let the plant focus its energy entirely on root recovery.
Prevention: Building a Root Rot-Proof Routine
Choosing the Right Substrate and Container
The battle against root rot is mostly won or lost before you ever pour a single glass of water.
Use a pasteurized commercial potting mix, not soil from your garden. Garden soils often contain root rot fungi.
Beyond that, the mix itself needs to drain freely.
Opt for a potting mix with ingredients like perlite and vermiculite, which improve drainage rates.
A widely repeated home-gardening myth: putting gravel or rocks at the bottom of a pot improves drainage. It doesn’t.
Use a pot with drainage holes, but do not put rocks or gravel at the bottom of the pot. The presence of rocks or gravel can actually inhibit drainage.
This runs counter to every instinct, but the physics are clear, a layer of coarser material below fine soil creates a perched water table that keeps moisture sitting against the roots.
Also think carefully about pot material.
Different pot materials affect soil moisture significantly. Terracotta pots are porous and allow for more evaporation, which can be beneficial in preventing overwatering. Plastic and glazed ceramic pots retain moisture longer, so you might need to water less frequently with those.
Smarter Watering: Signals and Schedules
Overwatering doesn’t mean giving too much water at once.
Over-watering means watering again too soon. It doesn’t matter how heavily you water when the plant is thirsty.
The key is timing, not volume.
For many tropical houseplants, the finger test works well for gauging when to water — wiggle your finger a couple of inches deep into the soil to assess the moisture level. If it’s moist, the bottom of the soil is markedly wet. Wait until the top layer is mostly dry before watering again.
And don’t forget seasonality:
you’ll need to switch up the amount of water your plant gets depending on the seasons. Generally, plants require less during colder, drier months.
The watering approach also needs to account for what happens after:
water the plant only when the top 3cm of compost feels dry, and allow the water to drain from the pot before returning it to its saucer, so the plant doesn’t have to sit with wet roots for long.
Saucers that collect standing water are a classic culprit. Empty them promptly.
Does Your Plant Species Change the Risk?
Not all houseplants are equally vulnerable.
Some house plants are more susceptible to root rot than others due to their specific care requirements. Plants that need moist or humid environments, such as ferns, peace lilies, and pothos, are less prone to root rot if overwatered or if the compost does not drain properly, while cacti and succulents, which need a free-draining compost, can get root rot more easily.
For root-rot-prone plant families like aroids and hoyas, including Monstera and Philodendrons, which like to partially or completely dry out before being watered again, choosing a soil-free mix is a safer bet.
For succulents and cacti, this is non-negotiable.
For cacti and other succulents and semi-succulents like Peperomia, where excess water causes big problems, a soil-free mix is the way to go.
For a deeper look at how care requirements vary by species, our guide to indoor plants care varieties houseplants covers the differences in detail.
Root Rot vs. Other Common Houseplant Problems
The frustrating thing about root rot is how closely it mimics other issues. A plant dropping yellow leaves could be dealing with root rot, a nutrient deficiency, a light problem, pests, or plain old overwatering without any fungal involvement. The diagnostic key is always: check the soil moisture and check the roots.
Fungus gnat damage will appear similar to any other root-related issue, such as root rot. Lower leaves may turn yellow and drop, and the plant’s growth may slow down or stop altogether.
The difference? With fungus gnats, you’ll see tiny dark flies hovering over the soil surface.
While fungus gnats themselves don’t directly cause root rot, their presence is a strong indicator that the soil is consistently too wet and that organic matter, like decaying roots, might be present.
Gnats are often a warning sign, not the root cause (no pun intended).
Yellowing leaves can also be a sign of spider mites or scale insects, especially if the leaves drop rapidly and are covered in sticky sap. Look for fine webbing and tiny moving dots (spider mites) in the curvature of the leaves, or small brown circles (scale) along the center vein.
These leave visible evidence on the foliage itself, root rot doesn’t. For a full comparison of these overlapping symptoms, see our article on why are my houseplant leaves turning yellow.
Leaves curling inward tell a slightly different story. That symptom often points to environmental stress, heat, dry air, or inconsistent watering, rather than a fungal root problem. Our dedicated piece on indoor plant leaves curling causes explains the distinctions. The bottom line: yellowing that affects the whole plant simultaneously, combined with soggy soil and a bad smell, points squarely at root rot. Isolated yellowing on a few leaves, or yellowing alongside visible pests, usually doesn’t.
FAQ: Quick Answers on Root Rot in Houseplants
Can you save a plant that has root rot? Yes, in many cases — provided there are still some healthy, firm white roots remaining.
Root rot cannot be reversed and can spread quickly, so letting it remain in its current state of decomposition will eventually kill the entire plant.
Act fast. Remove the rot, disinfect, repot in fresh soil, and radically cut back on watering.
How long does recovery take? There’s no fixed timeline, but visible new growth within four to six weeks post-treatment is a good sign. Some plants bounce back in a month; others need two or three months of very careful monitoring. The more severely the root system was affected, the longer the recovery.
Should you water after repotting a root rot plant?
Within the same week of repotting is fine. The soil should be slightly, naturally moist — water when the top few inches feel dry, as per normal.
Don’t drench it immediately after surgery.
Can root rot spread from plant to plant?
Root rot can spread from plant to plant thanks to airborne bacteria and fungal spores, and also through contaminated tools, reused soil, and shared drainage trays. Keep affected plants isolated and sterilize any tools that touched infected roots.
What’s the best potting mix to prevent root rot? One that drains freely and doesn’t compact when wet.
Things like perlite, pumice, leca, and similar amendments can all help reduce compaction and increase airspace. Finer, soil-based or peat-based mixes tend to hold a lot more water and become compact when wet, leaving little space for air.
Root rot is genuinely one of the most preventable plant problems out there, yet it remains one of the leading causes of houseplant death. The irony is that it’s almost always the result of care that felt like kindness: a little extra water “just to be safe.” The plants that thrive long-term are the ones whose owners learn to hold back, trust the dry finger test, and resist the urge to over-nurture. Mastering that restraint might be the most important skill any plant keeper can develop — and once you have it, your whole relationship with your indoor garden changes. Ready to go deeper? Our complete resource on houseplant problems covers the full diagnostic toolkit for keeping your plants in top health year-round.