Starting a garden indoors might seem like a challenge, especially for apartment dwellers with limited space. However, with the right techniques and a bit of creativity, you can cultivate a thriving indoor garden from seed. Let’s explore some effective seed-starting hacks tailored for small living spaces.
Key takeaways
- Discover unconventional methods to start seeds without plastic trays.
- Learn a compact technique that turns recycled materials into thriving seedlings.
- Find out how to optimize light, temperature, and watering for indoor growth.
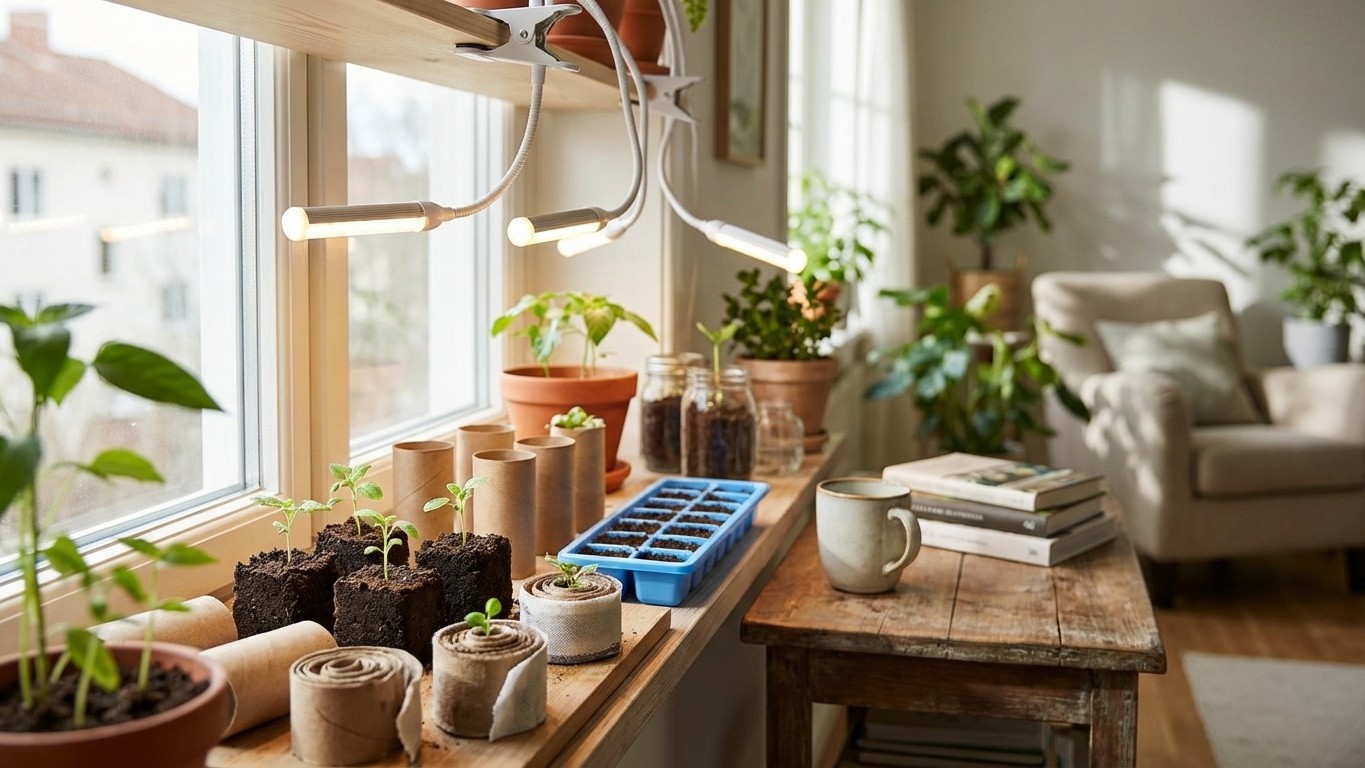
Embrace Soil Blocking for Healthier Seedlings
Traditional plastic seed trays can be cumbersome and wasteful. Enter soil blocking, a method that eliminates the need for containers altogether. By using a metal press to form compact cubes of a rich, fibrous soil mix, you create individual blocks where seeds can germinate. This technique promotes “air pruning,” encouraging roots to grow inward and develop a robust system, reducing transplant shock and fostering stronger plants. To get started, you’ll need a soil blocker, a suitable blocking mix (typically a blend of coco coir, compost, perlite, and garden soil), and shallow trays for bottom watering. While soil blocking isn’t ideal for all crops—root vegetables like carrots and beans are better sown directly, it’s perfect for transplants such as tomatoes, peppers, and flowers. Plus, it minimizes plastic waste and simplifies the transplanting process.
Utilize the Seed Snail Hack for Space Efficiency
When space is at a premium, innovative methods like the “seed snail” can be a game-changer. This approach involves repurposing materials like bubble wrap or polythene packaging to create a compact, spiral-shaped seed-starting roll. Here’s how it works: spread a layer of peat-free compost over a 10–20 cm wide strip of your chosen material, sow seeds at the recommended depth, roll the strip into a spiral (compost side in), secure it with tape, place it vertically in a pot, and water. This setup allows multiple seedlings to grow in minimal space, making it ideal for windowsills. After about six weeks, unroll the spiral and transplant the seedlings outdoors. Not only does this method conserve compost and space, but it also upcycles materials that might otherwise be discarded.
Repurpose Household Items as Seed Starters
Starting seeds doesn’t require specialized equipment. Many household items can be transformed into effective seed-starting containers. For instance, toilet paper rolls can be cut and folded to create biodegradable pots. Simply cut four 1-inch slits at one end of the roll, fold these flaps inward to form a bottom, fill with potting mix, and plant your seeds. These cardboard pots allow for excellent root aeration and can be planted directly into the garden, reducing transplant shock. Similarly, ice cube trays can serve as seed starters for tiny seeds or microgreens. Each compartment holds the perfect amount of soil for individual seedlings, and the trays stack neatly for space-saving storage. Fill each compartment with potting mix, plant seeds according to package directions, and place in a sunny window. The plastic design makes it easy to pop out seedlings when they’re ready for transplanting. These DIY solutions are cost-effective. Also, environmentally friendly.
Optimize Light and Temperature Conditions
Proper lighting is crucial for healthy seedling development. While a south-facing window can provide natural light, it may not be sufficient, especially during shorter winter days. Supplemental lighting, such as fluorescent or LED grow lights, can ensure your seedlings receive the 12–16 hours of light they need daily. Position the lights 2–3 inches above the seedlings, adjusting as they grow to maintain the proper distance. Temperature also plays a vital role in germination. Most seeds thrive in temperatures between 65–75°F. Using a seedling heat mat can provide consistent warmth, promoting faster and more uniform germination. Once seeds sprout, remove the heat mat to prevent leggy growth. Remember, while heat mats are beneficial for warm-season crops like tomatoes and peppers, cool-weather crops like lettuce or peas may not require additional heat.
Implement Bottom Watering Techniques
Overwatering or underwatering can be detrimental to seedlings. A practical solution is bottom watering, which encourages deep root growth and prevents soil disturbance. Place your seed containers in a tray, add water to the tray, and allow the soil to absorb moisture from the bottom up. This method ensures even watering and reduces the risk of fungal diseases. Once the topsoil feels moist, remove any excess water from the tray to prevent waterlogging. This technique is particularly useful in small spaces, as it minimizes mess and simplifies the watering process.
Starting a garden indoors in an apartment setting is entirely feasible with these innovative hacks. By embracing soil blocking, utilizing space-saving methods like the seed snail, repurposing household items, optimizing light and temperature conditions, and implementing efficient watering techniques, you can cultivate a lush indoor garden. Who knows? This might just be the beginning of a lifelong passion for gardening, regardless of your living space.