
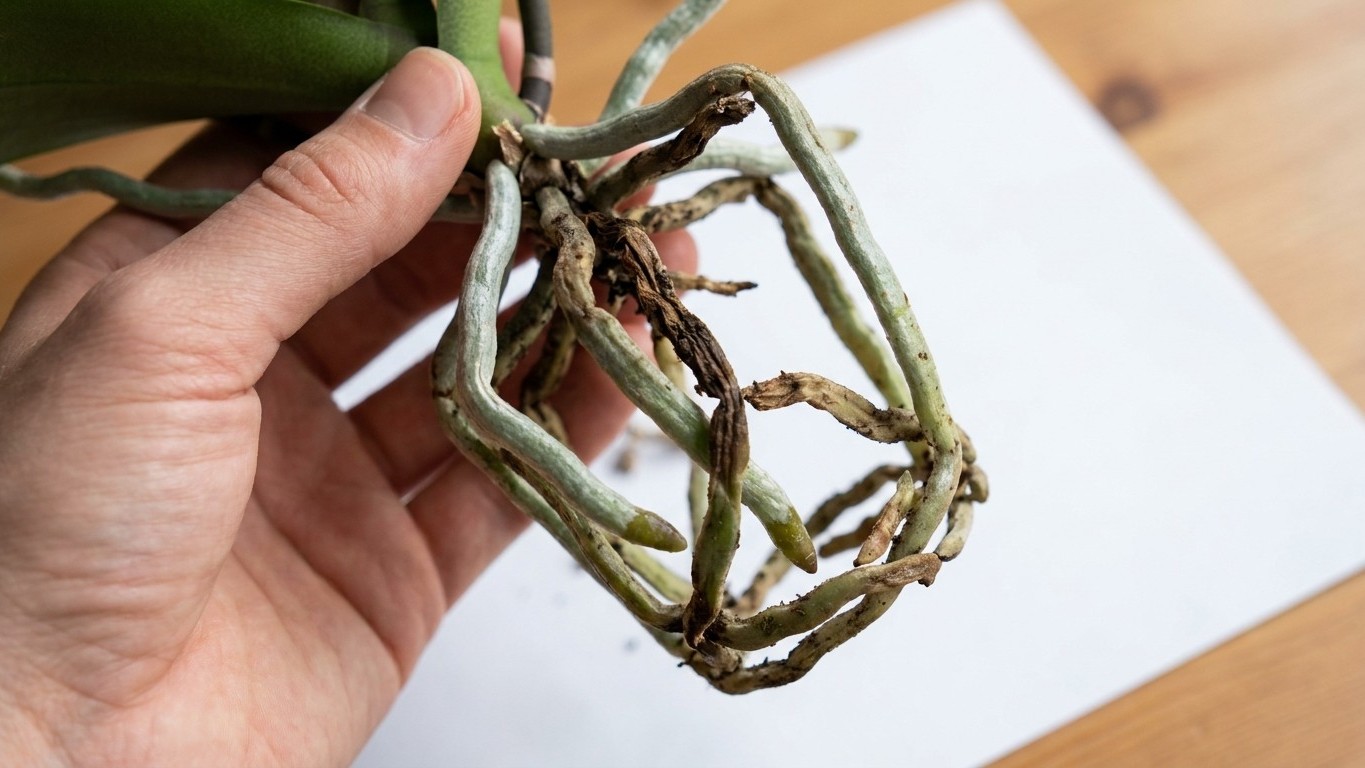
Two years of ice cubes, every Sunday, without fail. The orchid sat on the windowsill, bloomed twice a year, and seemed content. Then came repotting day, and the roots told a different story.
The brown patches had always been there, tucked beneath the surface of the bark mix, invisible until the plant came out of its pot. Some roots were firm and pale green. Others had gone soft, papery, almost hollow. A few were entirely brown from tip to base. The ice cube method had been doing something, but not exactly what most people assume.
Key takeaways
- Ice cubes cause localized cold shock to tropical orchid roots that never evolved to handle freezing temperatures
- The brown root damage was invisible for two years—until the plant came out of the pot and told the full story
- Root color codes reveal everything: bright green means healthy and wet, silver-white means healthy and dry, but soft brown means dead
What Ice Cubes Actually Do to Orchid Roots
The popular advice to water Phalaenopsis orchids with three ice cubes per week spread like wildfire around 2012, largely pushed by big-box retailers trying to simplify care instructions for casual buyers. The logic was appealing: slow, controlled melt equals slow, controlled watering. No overwatering. No mess. Easy to remember.
The problem is temperature. Phalaenopsis orchids are native to tropical and subtropical Asia, where soil and air temperatures rarely dip below 60°F. Ice cubes introduce localized cold shock directly to the root zone, tissue that evolved in conditions where such temperatures simply don’t exist. Research from the University of Georgia found that watering Phalaenopsis with ice caused measurable leaf damage and reduced flower longevity compared to room-temperature watering. The roots, though, are where the real damage accumulates quietly over time.
When I pulled mine out and laid the roots across a sheet of newspaper, the pattern was unmistakable. The brown patches clustered at the center of the pot, exactly where the ice cubes had been placed each Sunday. The outer roots, which had grown along the pot walls and occasionally escaped through the drainage holes, were healthy. They had never touched the ice directly.
Decoding What Root Color Actually Means
Orchid roots are unusually readable, once you know the code. Healthy roots on a Phalaenopsis are covered in velamen, a spongy layer of dead cells that absorbs water rapidly and then protects the inner root from drying out. Dry velamen looks silvery-white or light gray. Freshly watered velamen turns bright green, almost vivid. That color shift is one of the more satisfying signals in houseplant care.
Brown roots fall into two completely different categories, and mixing them up is where most people go wrong. Firm, tan-brown roots with intact velamen are often just old or slightly dehydrated, not dead, still functional. Soft, mushy, dark brown roots are rotted, likely from overwatering or cold damage, and need to be removed cleanly with sterilized scissors. Leaving them in place creates a vector for fungal spread to the healthy tissue.
A third category trips people up regularly: roots that look brown but are actually just stained by tannins in bark-based potting mix. Scratch the surface gently with a fingernail. If there’s green or white underneath, the root is alive. If the whole cross-section is brown and the texture is soft or stringy, it’s gone.
The Repotting Revelation (and What to Do With It)
Repotting an orchid after two or more years is genuinely instructive in a way that no amount of reading prepares you for. The roots document everything: how often it was watered, whether the pot drained properly, whether the bark had broken down into a fine, suffocating mulch. Bark mix degrades over 18 to 24 months, compacting around the roots and holding moisture far longer than it should. By month 30, you’re essentially growing an orchid in wet peat, which is the opposite of what Phalaenopsis roots need.
After trimming the dead roots back to healthy tissue and letting the cuts air dry for about 20 minutes, the difference in pot weight becomes obvious. A root system that’s half dead is dramatically lighter than it should be. That’s lost anchoring capacity, lost water uptake surface, and lost storage for the sugars the plant uses between waterings.
The right repotting medium for most Phalaenopsis is coarse bark (fir bark is standard), often mixed with perlite or horticultural charcoal to maintain airflow. The pot should have generous drainage and ideally be clear or semi-transparent, since velamen roots photosynthesize and benefit from light. A pot one size up from the root ball, nothing larger, orchids actually bloom more readily when mildly root-bound.
A Better Watering Method That Takes the Same Amount of Effort
Switching from ice cubes to the “soak and drain” method requires almost no additional effort and produces dramatically better results. Once a week (more in summer, less in winter), carry the pot to the sink and run lukewarm water through the bark for about 30 seconds, letting it drain completely before returning the plant to its spot. The entire operation takes under two minutes.
The visual feedback from the velamen color shift becomes your calibration tool. If the roots stay bright green for more than five days, you’re watering too frequently for current humidity and light conditions. If they go silver-gray within two days, water more often or consider a humidity tray. No guesswork, no timers, no counting ice cubes.
One detail that rarely gets mentioned: after repotting, hold off on watering for three to four days. The trimmed root ends need to callous over before being exposed to moisture again. Watering immediately invites rot into the fresh cuts. It’s a counterintuitive pause, especially after putting a stressed plant in fresh dry bark, but it’s the interval that actually determines whether the repot succeeds or fails six weeks later.