Dozens of cuttings. All of them sitting in water, green and perky for a week, then slowly going yellow, then nothing. No roots. No hope. For years, I was doing what seemed completely logical: snipping a stem, dropping it in a glass jar, and waiting. The problem wasn’t my water, my lighting, or my patience. It was where, exactly, my scissors were landing on that stem, and I was off by about an inch.
Key takeaways
- Most plant cuttings fail for a biological reason, not a care mistake
- There’s one specific spot on every stem that holds the entire rooting blueprint
- Moving your cut just one inch changes your success rate from zero to nearly guaranteed
The Inch That Changes Everything
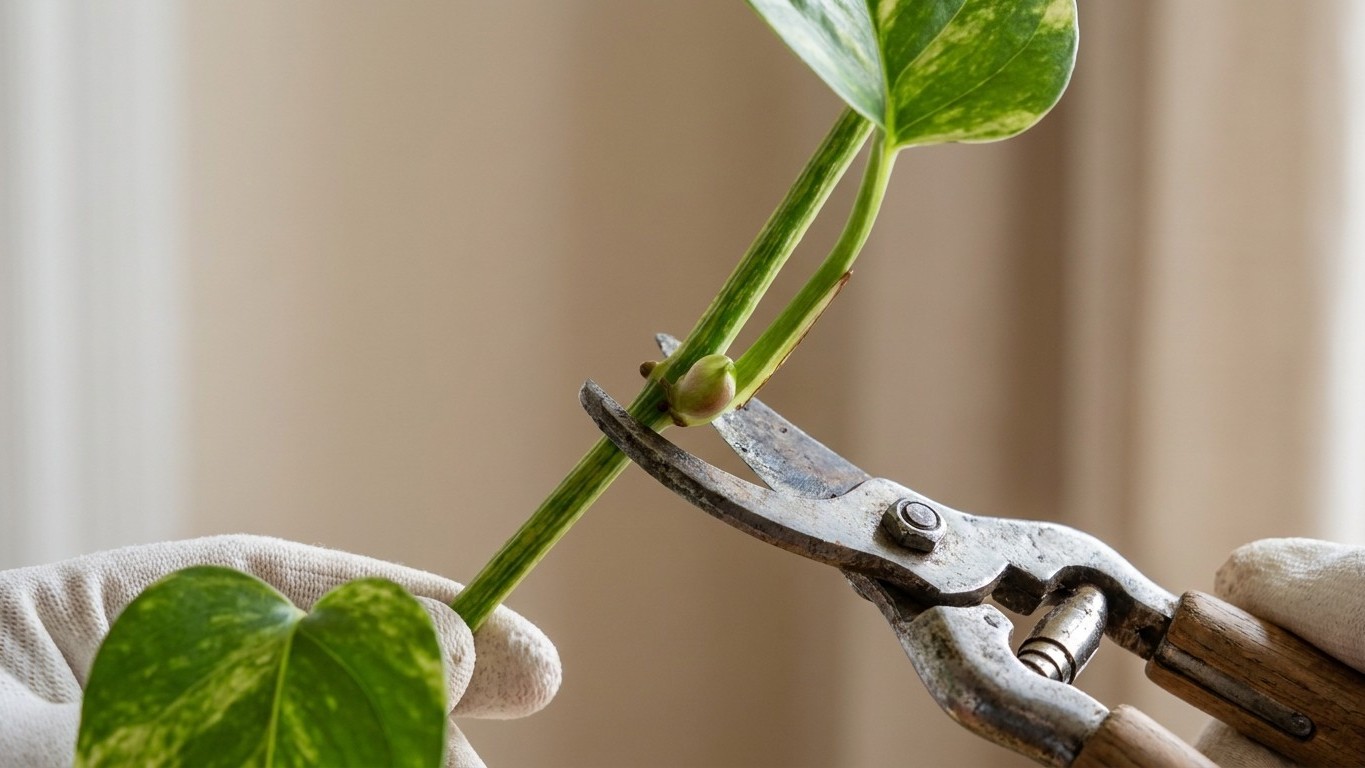
On a leafy stem, the node is the point where each leaf attaches to the stem. That little junction, sometimes a swollen bump, sometimes just a slight thickening, is not decorative. Nodes contain meristematic tissue: specialized cells that can differentiate into new roots, shoots, or leaves. A cutting without a node cannot produce roots or new growth and will eventually die. A cutting with at least one node has Everything it needs to become a new plant. Everything. The whole biological machine is packed into that one small spot.
For years, I was cutting mid-stem, roughly between two leaves, in what felt like a clean, tidy spot. Visually logical. Biologically useless. For propagation, internodes are essentially inert: cutting between nodes leaves no meristematic tissue to produce roots or new shoots from. This is why the guidance is always to cut just below a node rather than in the middle of the stem. My cuttings weren’t failing because of bad luck or wrong water temperature. They were biologically incapable of rooting. Think of it as trying to grow a new tree from a plank of wood rather than from a living branch.
When a cutting is placed in water or propagation medium, the meristematic cells at the node are stimulated by the presence of auxin (a growth hormone that accumulates at cut points) and moisture contact to differentiate into root cells. This process is specifically triggered at the node; it does not occur in stem tissue between nodes. Auxin, in case you’ve never heard it mentioned outside a biology class, is basically the plant’s internal messaging system for “start growing roots here.” Cut in the wrong place and that message has nowhere to go.
How to Identify a Node (Before You Ever Pick Up Scissors)
On a bare stem (from which leaves have been removed), the node is visible as a slight thickening of the stem or as a small scar where the leaf was attached. On plants like pothos or philodendrons, it’s often unmistakable, a small brown nub or a visible bump. On many aroids (Monsteras, Philodendrons, Pothos), nodes also produce aerial roots, either as small brown nubs or longer aerial roots that extend from the stem. These aerial root nodes are particularly valuable for propagation because the root-producing cells are already active. When you spot one of those aerial root stubs, you’ve essentially found a cutting that’s already halfway to rooting on its own.
For succulents and cacti, the logic shifts slightly. Succulents show subtle nodes as slight ridges or color changes where leaves attach. For cacti, look for areoles (small bumps), these are modified nodes. Never propagate from internodes; cut below an areole for new growth. Each plant family has its own version of the node, but the principle is universal: find the growth point, cut below it, not through it, not above it.
The exact placement matters more than most beginner guides admit. Carefully cut just below the node with a clean sharp knife or scissors, about 1/4 inch below the node. That small margin gives the node’s meristematic tissue full access to whatever medium it’s placed in, without leaving a long stub of dead internode tissue that just rots.
What Happens When You Finally Cut in the Right Place
Cut placement is a critical factor. Always cut just below a node, the part of the stem where leaves emerge. Nodes contain specialized tissue capable of forming roots. Even a small misstep, like cutting too far below or above the node, can significantly reduce success rates. The moment I started respecting that quarter-inch rule, my propagation success rate shifted completely. Not gradually, dramatically, within one or two batches.
A cutting needs a minimum of one node to root. However, cuttings with two to three nodes are more reliable because they have more sites for root development and more leaf area for photosynthesis (which supports the energy demand of root production). Two or three nodes per cutting is the sweet spot for most common houseplants. More nodes means more backup sites if one fails to activate, and more leaf surface means the cutting can keep producing the energy it needs while roots develop.
There’s also the question of leaves below the waterline. Remove leaves from all but one or two top nodes. This reduces moisture loss and directs energy toward root development rather than leaf maintenance. Submerged leaves rot quickly, cloud the water, and create conditions for fungal growth that can kill an otherwise healthy cutting. Strip them cleanly before the cutting ever touches water.
Getting the Conditions Right After the Cut
The correct cut location is necessary but not sufficient on its own. When cuttings fail, it’s typically for one of two reasons: they dry out or they rot. Drying out often shows up as wilting, shriveling, or dieback, starting at the tip of the cutting. This happens when there isn’t enough moisture to sustain the plant tissue or when high temperatures and air movement draw water out faster than the cutting can retain it. Rot, by contrast, appears as blackened, mushy tissue, often creeping up from the base of the cutting. It’s usually a sign of too much moisture, stagnant air, or low temperatures that slow rooting. Two opposite problems, both avoidable.
Place your plant cutting in a spot that receives bright to moderate indirect light. Do not place in strong, direct light or super-low light. Direct sun heats the water and stresses the cutting before it has any roots to absorb moisture. A bright north-facing windowsill, or a spot a few feet from a sunny east-facing one, tends to work well for most tropical houseplants. If you’d like to transplant your cutting from the glass vessel into a planter with potting mix, wait until the root is at least 1 inch long or longer. This should take 4-6 weeks.
For those who prefer soil propagation from the start, the depth rule mirrors the water rule. Make a small hole in the soil and insert the cutting so that the node is about 1 inch below the surface. Firm the soil around the cutting to hold it in place. A well-draining mix with perlite or coco coir prevents the waterlogging that causes rot before roots form. One Overlooked detail worth knowing: tip cuttings are often slightly faster to root because the tip contains high concentrations of auxin and active meristematic tissue. If you’re taking multiple cuttings from one plant, the top tip cutting is usually your strongest bet.
Sources : cleverbloom.com | fraservalleyrosefarm.com