Every summer, the watering can comes out on the same day, at the same time, in the same amounts. Twice a week, no questions asked. The plant wilts slightly mid-July? More water. The leaves yellow a little? Water again. That’s care, right? Until the day you finally pull a struggling plant from its pot, and the roots tell a completely different story. Brown, mushy, barely there. What you thought was thirst was actually drowning.
This isn’t a rare story. Overwatering is quietly the number one mistake plant parents make, and the tricky part is that it looks almost identical to underwatering. A wilting plant triggers the instinct to water. Which, if the soil is already saturated, makes Everything worse. The diagnosis loop is brutal and surprisingly easy to fall into for years.
Key takeaways
- A plant owner discovers their 12-year watering routine was actually drowning their plants in plain sight
- Wilting leaves and yellow foliage don’t mean your plant needs more water—they might mean it’s suffocating
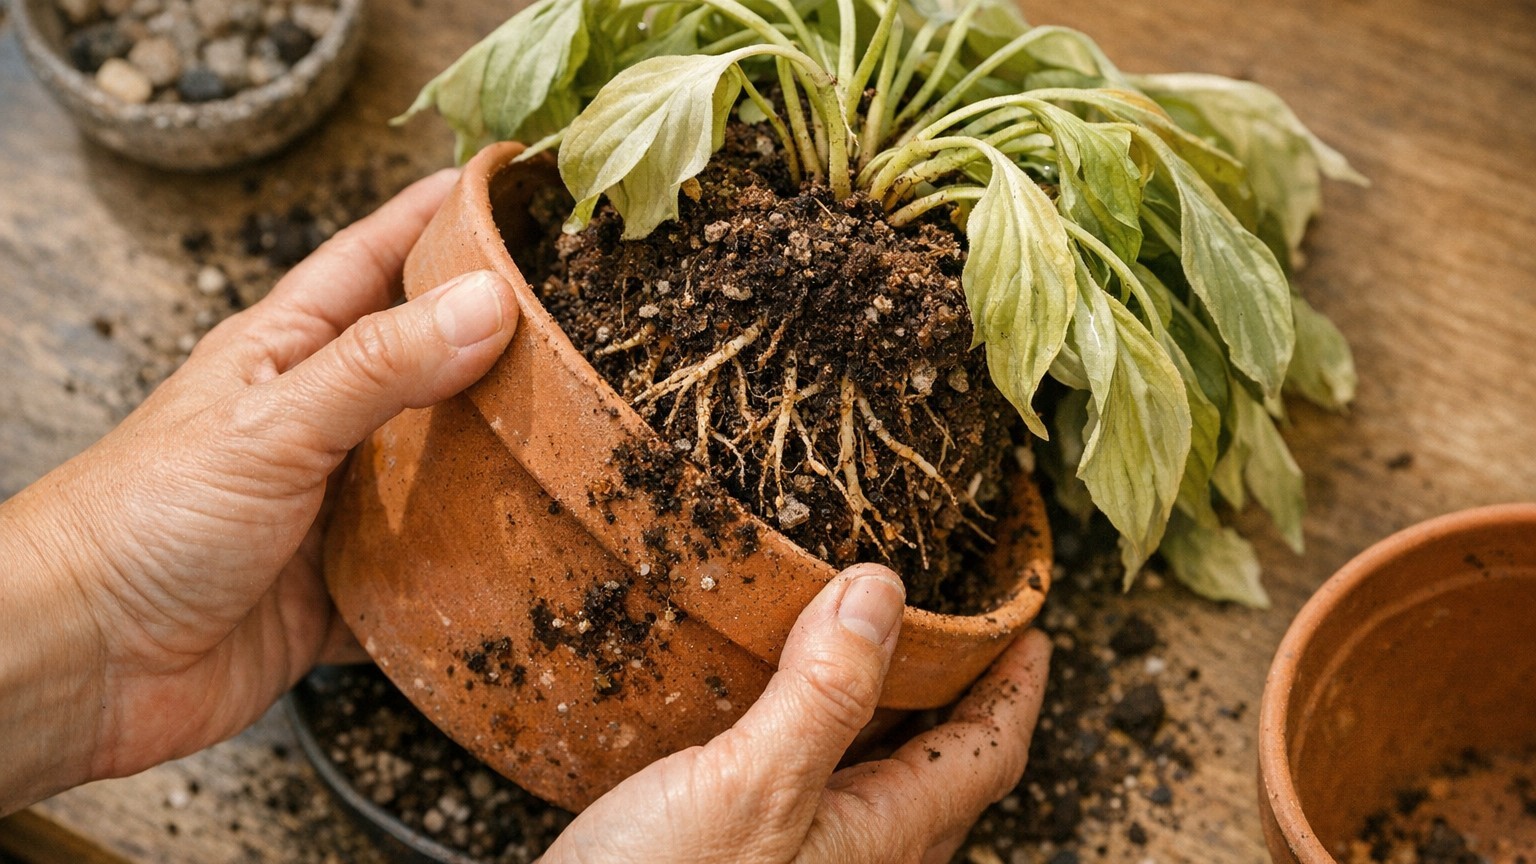
- The moment of truth: pulling back the soil reveals brown, mushy roots that tell a completely different story
What’s Actually Happening Underground
Root rot usually develops when soil stays too wet for too long. Plant roots need oxygen as well as water, and in saturated soil they can’t “breathe.” Without oxygen, roots weaken, die, and begin to decay. Think of it less like drowning and more like suffocation, slow, invisible, and by the time you see symptoms above the soil line, the damage has been going on for weeks.
The cruel twist is what root rot does to the plant’s surface appearance. Surprisingly, overwatering can mimic the symptoms of underwatering. Damaged roots lose their ability to transport moisture effectively, causing leaves to wilt despite the presence of excess water in the soil. This phenomenon, known as physiological drought, can also manifest as leaf edema and necrosis at the leaf tips and margins. A plant dying of root rot looks, from the outside, like a plant begging for more water. So you water it. And it gets worse. Watering a plant with root rot is akin to giving a drowning person a glass of water.
Root rot is one of the most dangerous threats to indoor plants, and it’s often mistaken as a problem caused by overwatering alone. But the real culprit is usually a pathogen, fungi like Pythium, Rhizoctonia, or Phytophthora, that thrives in waterlogged conditions. The water doesn’t rot the roots directly. It creates the airless, fungal-friendly environment where rot takes hold and spreads. Once root rot sets in, it can spread quickly if not caught early.
The Signs You Probably Missed
Root rot starts in your plant’s root zone, hidden by soil, and stays out of sight and out of mind until it’s advanced. By the time anything is visible above ground, serious damage is already underway. Still, the signals are there if you know what to look for. If a plant is overwatered, it will likely develop yellow or brown limp, droopy leaves as opposed to dry, crispy leaves (which are a sign of too little water). Wilting leaves combined with wet soil usually mean that root rot has set in and the roots can no longer absorb water.
There are other clues. If your plant is dropping old and new leaves alike, you’ve likely overwatered. The shedding leaves can be green, brown, or yellow. Fungus gnats hovering around the base of a pot are another tell, moist conditions encourage the growth of mold or algae on the soil surface, and the presence of fungus gnats, which thrive in consistently wet conditions. And then there’s the smell. If you’re hit with an unpleasant smell and sopping wet soil, that’s a good clue that conditions favoring root rot are there — and you’ve been overwatering for a while.
The definitive test requires pulling the plant out. Healthy roots are firm and white or cream-colored. Rotted roots are brown or black, soft, and mushy. In some cases, the outer layer of the root may slough off easily. That moment of unpotting, actually looking at the root system, is the only way to know for certain. And for many plant owners, that moment doesn’t come until the plant is nearly gone.
How to Actually Save the Plant
Speed matters. Root rot cannot be reversed and can spread quickly, so letting it remain in its current state of decomposition will eventually kill the entire plant. The recovery protocol, however, is straightforward once you know it. Start by removing the plant from its container and trimming away soft or blackened roots with clean scissors. Repot the plant in fresh, well-draining soil and a container with drainage holes.
Sterilization matters too, at every step. Sterilize your cutting tools with rubbing alcohol or boiling water before and after trimming to avoid spreading pathogens. After trimming, lay the plant on a clean paper towel or cloth and let the roots dry out for a few hours. This step is important to allow the cut roots to callous over and to remove excess moisture, which will help prevent further fungal growth.
One step most people skip: pruning the leaves back proportionally. A good rule of thumb is to prune away damaged roots and leaves at the same rate. For example, if you needed to remove a quarter of your plant’s damaged roots, you’ll also want to prune away about a quarter of the plant’s leaves. A plant with a compromised root system simply cannot sustain its full leaf canopy, reducing the foliage takes pressure off the weakened roots during recovery. After repotting, don’t water the plant right away. Let it sit in its new pot for a few days to allow the roots to settle and recover. Once you do start watering, do it sparingly — wait until the top 1-2 inches of soil are dry before watering again.
Breaking the Fixed-Schedule Habit
The core problem, for most people, is the calendar. Plants should not be watered on a schedule, but rather should be watered when they need it. Factors that influence plant watering include differences in potting media, humidity, and temperature. A plant on a south-facing windowsill in July is a completely different organism from the same plant in the same pot on a cloudy November day. Treating them identically is the mistake.
Checking the moisture level of the potting mix before watering is the first step to preventing overwatering and root rot. Feel the moisture level with your finger before watering your houseplants. If you detect the potting mix is pretty moist, that gives you a sign not to add water. Alternatively, you can pick up your plant and check the weight. A dry plant is a lot lighter than a wet plant due to the amount of moisture the potting mix can hold. Over time, you should be able to develop a good sense of how light your plant should feel when it’s time to water.
Pot choice makes a real difference too. Terra-cotta containers typically allow the potting mix to dry out faster than plastic or ceramic pots, because of the porous nature of the material. Moisture evaporates from the sides of the pot, not just the top. A plastic pot holding the same amount of soil will stay wet significantly longer, a detail that matters enormously when watering habits are already on the generous side.
There’s one more variable that veteran plant owners often overlook: your plant’s water needs don’t stay the same year-round. During spring and summer, plants are actively growing and drinking more, so watering more frequently makes sense. Come fall and winter, growth slows down significantly, and overwatering becomes an even bigger risk. The same watering routine applied across all four seasons, year after year, will almost inevitably cause problems in the quieter months, which is often where the cumulative damage begins, long before summer arrives and the problem finally surfaces.
Sources : gardensillustrated.com | allaboutplanties.com